The 5MContest tutorial (by Vladimir Timofeev - RA9UN)
5MContest Tutorial
Tutorial Contents
Introduction - General 5MContest information.
Radio Interface - information about the Radio/Computer connection.
Network - Working with 5MC in a network
Start and choice - Starting 5MC and selecting a contest.
Macros - How to create macros.
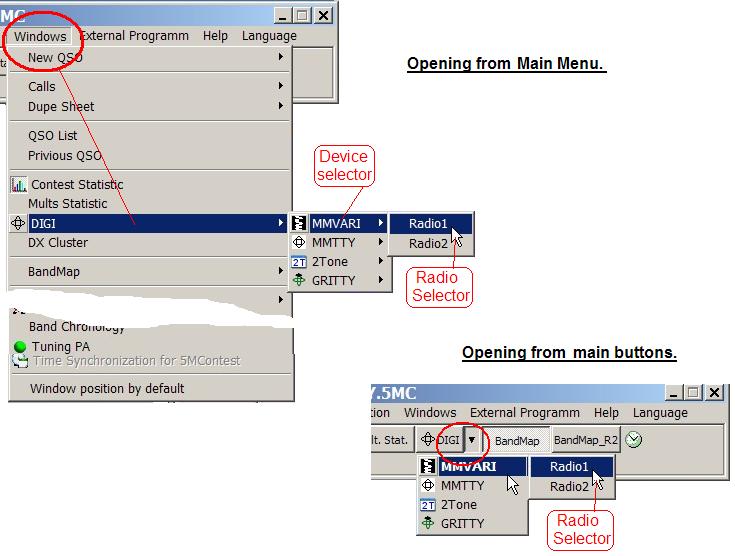
DIGI - Setup for digi (RTTY and PSK).
Spots and Band Map - Visualization help for QSO partner search
Cluster and Skimmer - Automatic automatic searching of QSO partners
Contesting - Specific information for individual contests. (WAE, VHF etc.)
Contest log creation - Creating new contest logs.
Managing the Software - A description of the 5MContest software and its elements.
5MContest Settings - A detailed description of the "5MContest setting" form and its elements.
Design - Customizing the look and feel of 5MContest.
Introduction
5MContest does not require any registration.
When first installed 5MContest installs all folders and files automatically on the hard disk of the computer.
5MContest is free of charge. Do not install it from unknown sources.
5MContest does not harm your computer.
Nobody can use 5MC as a commercial product.
5MContest can be operated by anyone.
5MContest HELP
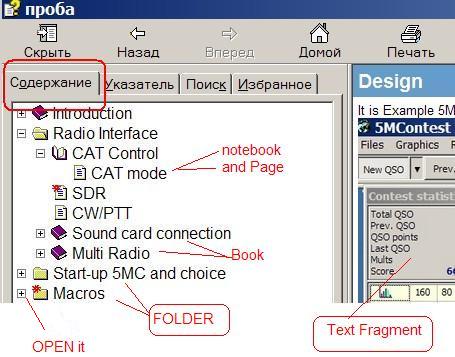
This user manual is hierarchically structured into Folders, Books, Notebooks and Pages.
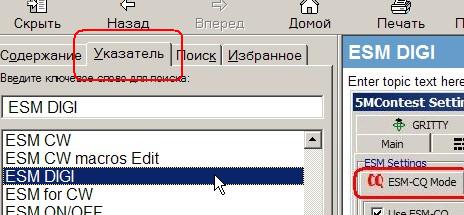
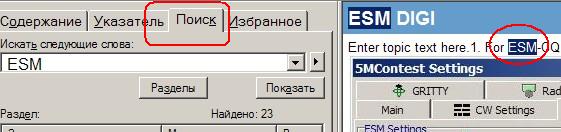
Search allows to find individual words in the users manual.
Words to be found are entered into the search field (Example - ESM).
As a result all the lines where the word is found are displayed.
To select a row in the section.
At rigft part Will show all of these words in this section.
A search for the word.
Enter the known word (Example - ESM).
Show the lines of the leaves with this word.
To select a row in the section.
At rigft part Will show all of these text in this section.
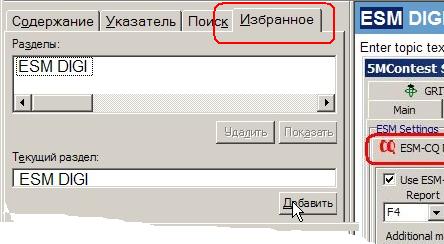
For quick to remember the forgotten. Enter section Name as here.
About 5MContest
The ham radio software 5MContest
Autor: Vitaly Filonenko – RM5F ex UW5M e.t.c.
Special Thanks to:
- Alex Shovkoplyas - VE3NEA (Afreet Software, Inc) for the COM/OLE Master Callsign Database component interface and the Omni-Rig radio interface.
- Alexander Anipkin - RZ4AG for his design ideas
- Jose Francisco Vives Piero - EA5FQ and
- Jose Luis Rami - EB2RA for their Spanish interface translation
- Makoto Mori - JE3HHT for the remote control mode of MMTTY and the MMVARI ActiveX control
5MContest is a software intended to support individual HAM radio operators or teams to work in radio amateur contests on HF and VHF. It supports not only all large contests but also 250 various smaller contests.
For 5MContest the computer to properly run needs a Windows operating system (XP, Vista, Win7, Win8, Win10)
To use the full functionality of 5MContest the computer should have:
· one real or virtual serial COM-port for the ÑÀÒ-interface,
· another independent real or virtual port (COM or LPT) to manage CW/PTT,
· a sound card to run the SSB, DIGI-AFSK and SDR functions,
· a SDR device,
· a permanent internet connection.
If some of these requirements are not met, 5MC will still work, but with reduced functionality or less comfortable.
Registration
1. 5MContest does not require any registration.
2. When first installed 5MContest installs all folders and files automatically on the hard disk of the computer.
3. 5MContest is free of charge. Do not install it from unknown sources.
4. 5MContest does not harm your computer.
5. Nobody can use 5MC as a commercial product.
6. 5MContest can be operated by anyone.
Installation\Removal
To support 5MContest your computer needs to run a Windows operating system (Windows XP, Vista, Win 7, Win 8 or Win 10).
The computer screen resolution should not be less than 1024õ768 px,
processor clock speed not less than 2,0 GHz and the RAM size not less than 900 MByte.
The most recent full version of the program can be found on the official 5MContest
1. Installation requirements:
· To support 5MContest your computer must run Windows XP, Windows 7 or Vista operating system.
· The computer screen resolution should not be less than 1024õ768 px,
· processor clock speed not less than 2,0 GHz and the RAM size not less than 900Ìá MByte;.
The most recent full version of the program can be found on the official 5MContest website for download - http://5mcontest.qrz.ru as 5MContest_FULL_Setup.exe
|
Run the installer on your computer.
· Run the installer on your computer. Follow the instructions and recommendations of the installation program. · 5MContest will automatically install - all necessary folders and files correctly in the folder C:\5Mcontest. In this folder you will find the file to start the program . . · You should not spontaneously copy the folder C:\5Mcontest to other disks or computer. The software will not work if not properly installed. Only use above installation files for this purpose!
5MContest program updates are regularly published on the 5MContest web site. Check the site regularly for new updates! Updates are called like MContest_UP_251111.exe (whereas 251111 is the date of the updates.) From time to time it is only possible to update 5MC by running a full new installation.
To work with CW/PTT through LPT ports, it is necessary to have the driver DLPortIO installed on the PC, The driver installation file can bei downloaded as InstallDLPORTIO.exe (~ 352 KB) from the 5MContest web site.
3. Updates: When running program updates user customization and settings are kept.
For a good performance of all software functions your computer must have:One real or virtual COM-port for the ÑÀÒ-interface, · and another independent real or virtual port (COM or LPT) to manage CW/PTT. · A sound card to run the SSB, DIGI-AFSK and SDR functions · an SDR device. · a permanent internet connection. If these required features are missing, you still can use 5MC, but will with reduced functionality and less comfortable.
4. Removal:
To uninstall 5MContest click the file in the folder C:\5Mcontest. |

Radio Interface
5MContest is most helpful when it installed on one or several computers connected to one or several transceivers properly configured to participate in a contest.
The computers with the 5MContest program should be properly connected with one or several transceivers. To avoid damaging equipment it is necessary to adhere strictly to the recommendation of the manufacturers of the transceivers used and to have the knowhow needed to connect and configure computer-ttransceiver connections.
1. Additional requirements to the computer: Two or more physical or virtual ports. One of them should be a COM port. It is needed to control the transceiver through the CAT interface.
2. Requirements to the transceiver: It needs an interface to be controlled from a computer.
The contents in this section:
· CAT - about the CAT interface.
· CW and PTT - about the connection to key CW and switching between RX and TX.
· Sound cards connection - about the use of the soundcard for SSB and DIGI.
· Multi radio - about connecting and configuring a second radio.
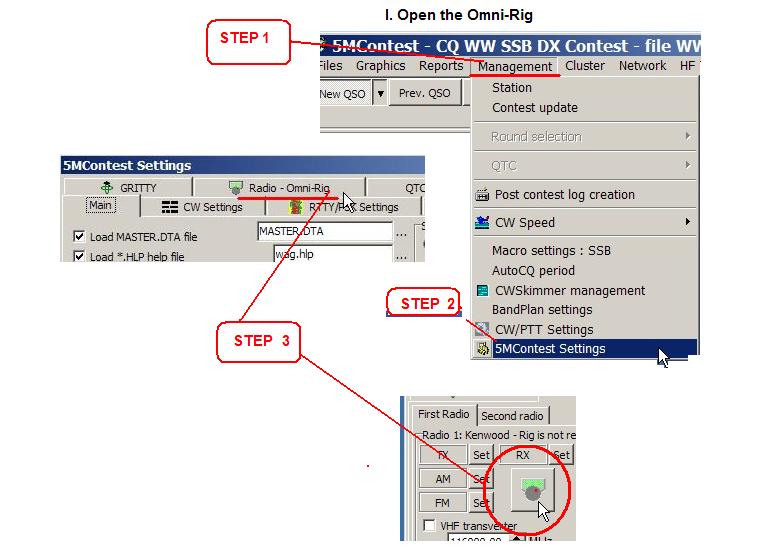
CAT Control
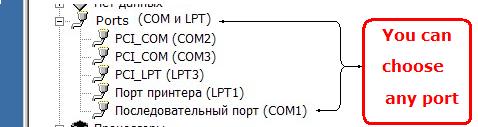
To use the CAT interface connection the computer must have a COM port. It can be a real or virtual interface to connect the transceiver. You can find the actual COM port via the Device Manager of your computer.
Through the CAT-system the PC can interact with the frequency and modulation.settings of the transceiver.
A. Preparing the CAT interface (frequency control):
|
|
Example – “Kenwood” as Radio 1
Example - COM 2 as the serial port for CAT.
Check in the Device Manager of the computer, what the serial port number for your interface is, once the computer and the transceiver are connected. You have: . Device Manager, you need to look at what ports You have.
|


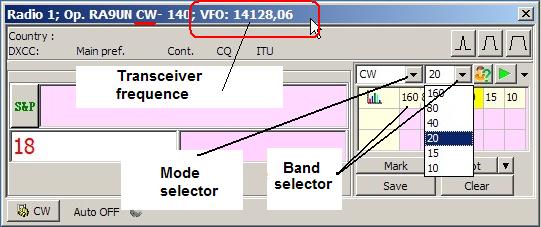
· When only one transceiver is connected to the computer the RIG 2 Rig type setting should be set to "NONE".
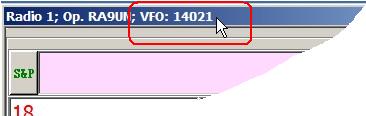
-If the CAT interface works the VFO frequency is shown on top of the “Radio window” (the New QSO window for the respective radio, in the example above “VFO:14021”.
Remark:
If you only one radio is connected to the PC the RIG 2 "Rig type""Port" setting must be "NONE".
CAT mode
B CAT Mode Control

A. Data CAT - Click Button OMNY RIG
Preparation CAT (MODE control):
To precisely set the frequency clicking on cluster spots, the used sideband for the mode needs to be specified.
Optionally the mode settings can be set to NONE. Changing bands or modes the sideband will then not change at all.
SDR
SDR
· The abundance of different designs and methods do not allow us to make definite recommendations
But if everything was done right Your PowerSDR will be live.

Pic. PowerSDR
.png)
CW/PTT
You can to work CW manually with a keyer or with automatically key with 5MC from the keyboard. It is possible to combine the two.
For the automatic transmission of a CW message, the computer must have a COM or LPT port.
If using LPT, to file InstallDLPORTIO.exe (~ 352 kB) must be installed. It can be downloaded from http://5mcontest.qrz.ru.
|
I. The associated port can be looked up in the Device Manager of the computer.
|
CW/PTT Pins: Pins for CW and PTT for different plugs are: In this example 5MContest for CW and PTT it is using pins of a 9-pin COM-port - COM port 25-pin: DTR(CW) 20; RTS(PTT) 4, GND 5 - LPT 25-pin: DTR(CW) 17, RTS(PTT) 16 |
II. Radio Settings:
|
|
Open the setting Form... |
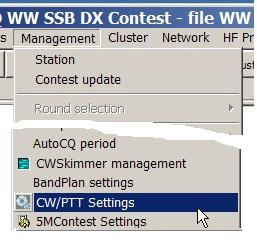
For the radios (Radio 1 and Radio 2) attached the CW and PTT ports need to be defined. The CW port is needed for the transmission of the CW macros, the PTT port switches TX/RX of the transceiver. For one radio the same serial or parallel port may be used for both functions.
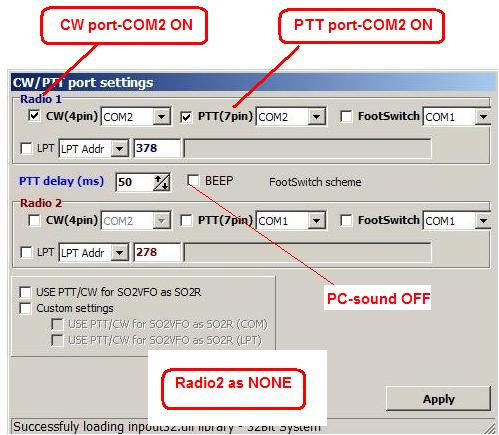
- Button "PTT delay": Delay of PTT in ms, Button "Apply": Save settings.
This PTT-setting will use ALL MODE
If the LPT-port is used, the file “InstallDLPORTIO.exe” (~ 352 KB) needs to be installed. It can be downloaded from http://5mcontest.qrz.ru.
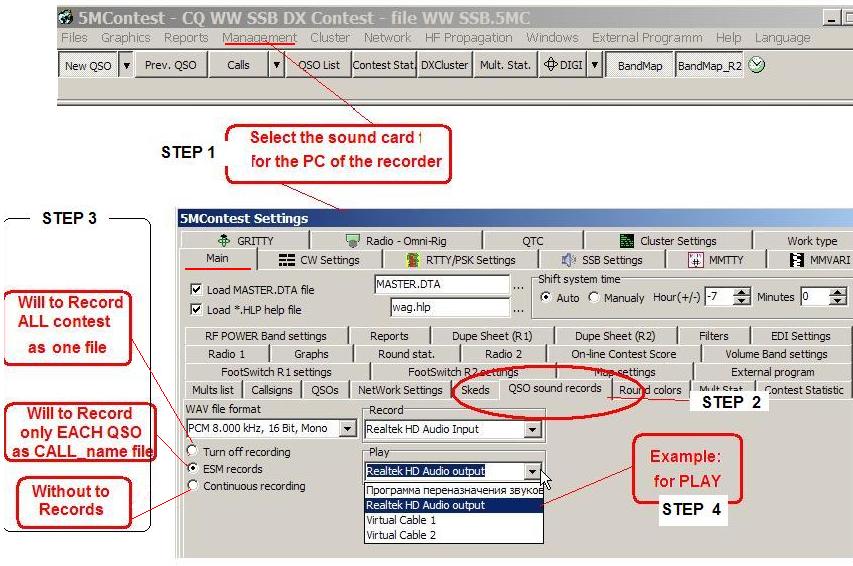
Sound card connection
The PC’s sound card (or cards) can be used for SSB, DIGI and PC Contest Recording.
· Soundcard connection - For SSB. Used to transfer the macros. Should not to use as a microphone.
· Soundcard connection and settings for modes (RTTY and PSK) - here
· PC Contest Recording - PC Contest Recording - For Editing QSO-info After contest.
PC Recorder
The PC Recorder can be used for record all QSOs of contest on the PCs hard disk.
All audio records will be:
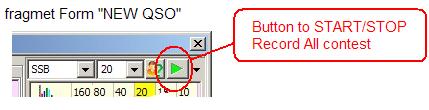
· START - to each click ESM CQ or F1, or macros ~[NEW RECORD]
· STOP - the End This QSO.
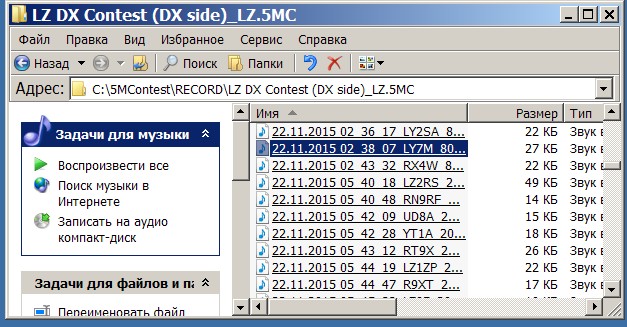
· EXAMPLE FileName - 21.11.2015 12_20_15_LZ5W_20M_CW.mp3
· SAVEd - in folder “C:\5MContest\RECORD\ContestName”.
About To listen records - HERE
To Open Select of the Recorder:
Multi Radio
5MContest allows to work with use of two or more radios.
Every network participant has their own equipment and personal 5MC settings. Options for it - Network
the use of TWO transceivers and their osobennosti with the use of a single computer. Options for it - SO2R
SO2R
2. For SO2R You need to have once computer and:
· one or two radios, one
· transceiver and SDR
!!! Making settings be SURE to pay attention - it will be for Radio1 or Radio2 !!!
Options for SO2R
SO1R or SO2R: Using one or multiple radios connected to the PC.
Single Op 2 VFOs (SO2V): Emulating 2 radios using one both VFOs of one radio (see image above)
Single Op 1 Radio+SDR – Using one radio (R1) plus emulating a second radio (R2) with a SDR.
1. Open the Work Type Setting Form (Menu Management-5MContest Settings-Work type)

SO1R or SO2R
1. SO1R or SO2R: Using one or multiple radios connected to the PC.
|
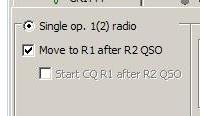
Option: Automatically start CQ from Radio 1 after Radio 2 QSO |
Sub-tab: Single Op. 1(2) radio
|
|
The Omni-Rig transceiver interface supports a maximium of 2 transceivers. For each TRX Omni-RIG settings have to be set (i.e. Rig Type, Port, …). Example: Selecting a FT-2000 as RIG 1
|
When Radio1 – TRX 1 and
With SO2R is activated, it is possible - when sending one radio to still listen on the frequency of the other radio. - to listen to both radios when no radio is sending. SO2R is a means to use the time doing outband S&P QSOs when at the one radio is calling CQ and not getting immediate answers. |

SO2 VFO
SO2 VFO
Select “Single operator 2 VFO” on the WORK TYPE form
This feature is available with transceivers having 2 independent VFOs.
Like that:
- it is possible to listen at the same time to signals on two frequencies,
- to call or answer calls on any of the two. It is impossible though to listen to any signal during transmission.
|
If using SDR as second VFO:
DETERMINING Example: SDR frequency will determine the value for the TRX frequency.
To use of SDRs further 500m at now against the contest rules!! |
Sub-Tab: Single operator 2 VFO
Setting „Add Tone”Without CW-tone" |
VFO switching settings
Example: for Kenwood
For Radio 1: TX/RX: VFO A/A
|
When Radio1 – TRX 1, Radio2 – NONE, Single operator 2 VFO selected
|
№ |
Situation |
Radio1 |
Radio2 |
|
1. |
R1 sending |
MUTE |
MUTE |
|
2. |
R2 sending |
MUTE |
MUTE |
|
3. |
R1/R2 receiving |
HEARABLE |
HEARABLE |
This feature is available with transceivers having 2 VFOs with independent receivers.
Like that:
- it is possible to listen at the same time (or independently) to the signals on two frequencies,
- to call or answer calls on any of the two. It is impossible though to listen to any signal during transmission.
SO2V is a great means to use the time doing inband or outband S&P QSOs when calling CQ and not getting immediate answers. For outband S&P SO2R is more effective since the second radio can also receive when the first radio is sending.
Using the WebSDR window with SO2R or SO2V:
Switching on the WebSDR window (Use WebSDR with SO2R), the SDR is always hearable, independent of whether R1 or R2 are sending. Its frequency control can be controlled from one of the radios and/or the WebSDR QRG setting can control on of the radio’s frequency.
Remark: Set Omni-Rig RIG 2 Rig type to “NONE” if no second TRX is connected to the PC.
If using SDR as second VFO:
DETERMINING
Example:
SDR frequency will determine the value for the TRX frequency.
To use SDRs at a distance beyond 500m may be against the contest rules!
Radio+SDR
Select “Single operator Radio1, Radio2 – WebSDR” on the WORK TYPE form
Single Op 1 Radio+SDR – Using one radio (R1) plus emulating a second radio (R2) with a SDR.
Set Omni-Rig RIG 2 - Rig type to “NONE“
Like that:
- it is possible to listen at the same time (or independently) to signals on two frequencies,
- to call or answer calls on any of the two. During transmission the operator can always listen to the SDR’s frequency.
- The transceiver will transmit on the frequency of the activated radio (R1 or R2).
 Settings for TRX Frequency and CW tone
Use NewQSOR1 with a TRX and NewQSOR2 window with WinSDR only SO1R+SDR
When Radio1 – TRX 1
Radio2 – SDR (Use WebSDR as Radio 2)
|
№ |
Situation |
Radio1 |
Radio2 |
|
1. |
R1 sending |
MUTE |
HEARABLE |
|
2. |
R2 sending |
MUTE |
HEARABLE |
|
3. |
R1/R2 receiving |
HEARABLE |
HEARABLE |
i.e. when sending with Radio 1 only the audio of the sending TRX 1 is muted. During CQ calls or other exchanges the operator can listen to the other radio’s traffic (WebSDR).
The frequency of the SDR is always hearable, independent of whether the TRX is sending on R1 or R2.
Remark: Set Omni-Rig RIG 2 Rig type to “NONE” if in this setup no second TRX is connected to the PC.
To use SDRs at a distance beyond 500m may be against the contest rules!
Network
Through the 5MC’ network functions contest teams can work together with one general log. Two or more PCs with 5MC installed can be connected.
Setting up the log synchronization is explained here.
All computers participating in the network must be individually connected to their transceivers through their CAT, CW/PTT and other interfaces. There is no change at all to the way users work with the 5MC program.
5MContest allows the blocking of simultaneous transmission of the TRXs participating in the network. To avoid equipment damage in unplanned situations, it is necessary to apply interlock hardware to independantly block the TRXs.
Any computer with 5MC in the network can setup as either on of the client or as the server. More information about this setup can be found here.
As soon as one computer with 5MC is configured as server, it connects all the computers with active 5MC in the network as clients using the TCP/IP protocol.
Clients can not pinging between him.
As soon as there is a connection between a remote computer running 5MC and the 5MC network server PC, the communication between these PCs will be started.
About jointly using TX numbers in the 5MC Network here
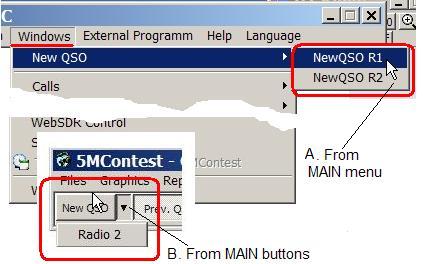
5MC networking is started from the main menu item “Network"
|
Network menu:
|
Select the line "Network mode"
If "Network mode" is not active, the other lines of the menu are inactive (gray).
- Network settings – about network start-up and connection - "Chat” – Form to allow team member dialogue. - "Network information" – information about the status of the active 5MC team members activity. - "Generation of virtual QSO" – Starting the generation of sample QSO entries for network testing purposes. |
Networking must be switched off when the 5MC network function is not used. The program will otherwise have issues providing correct TX numbers.
-
Network settings
“Network settings” under Menu-Network starts the “Network Management" window.
The "Network Management" will show up. It allows to enter the settings for the data connection.
Start the “Network Management” window here.
· "My IP" shows the IP address of the computer. This is an information field with input from the computer’s network settings and cannot be changed.
· "Port": The application’s port on the computer. Per default the 5MS listens to port 1024.
· "Server IP": The IP-address of the computer defined as the 5MC network server. It must be set to the same address on all networked computers with 5MC running , including the server computer itself! Like that the server computer is made aware of its role.
· "Network Name" – the name of the computer in the 5MC network. Use individual names for each computer. This name will identify the computer in the “Network Information” window.
· Left Button – Enable the acces to the network of this computer. In the example above the network services are enabled.
· Right Button – Disable the access to the network for this computer.
Network Management-menu - Contents and notes:
· "Client/Server" – Set the 5MC network role of this computer as either Client or Server
· "Mode" –Setup the DX spot management for this computer
· "Synchronization" – Controlling the log synchronization
· "Help" - Open the “Network” topic of the tutorial
If Network is switched off for the computer the field "TX-NUM" of the "NewQSO" window will clear.
Client/Server
"Client/Server" menu position of the “Network Management” window
|
Setting demand of this computer
|
Role of the computer in the 5MC network:
Select, whether the computer · works as Client · works as Server. Only one computer can take over the Server role for the network. Select whether the Client connects itself automatically with the Server. |

Mode
menu - "Mode" - Setting the SPOT's separate on their BM.
Mode
"Mode" menu position of the “Network Management” window
|
|
Enable/disable DX spot services
Example: Receiving DX spots is enabled |
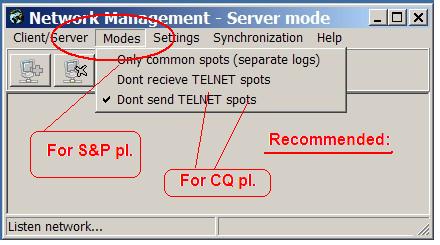
· "Only the total cluster" – if this option is ticked all DX and local spots received or created on any computer in the network are also shown in the BandMap window of this computer. If the option is not ticked, only the spots from the connected cluster by the 5MC on this computer are shown.
· "Do not take internet spots" – if ticked, DX Spots from the internet are not shown in the BandMaps of this computer.
· "Don't send TELNET spots" – if ticked, spotting to the Cluster from this 5MC installation is disabled.
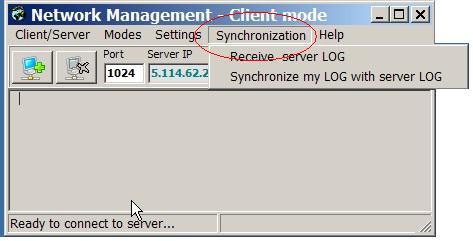
Synchronization
"Synchronization" menu position of the “Network Management” window
|
|
Available on Client computers: Starting the synchronization:
· Overwrite own log with the Server log. · Synchronize the log on the Client with the log on the Server. |
Chat
“Chat" menu position of the “Network Management” window
This menu position starts the “Chat” window. It allows team members on the 5MC network to communicate.
Chat window:
|
|
Main menu "Network"
Start the “Chat”window here. |
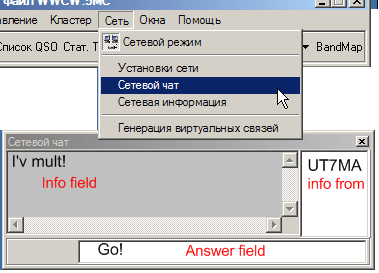
Sample chat dialogue
Network information
Network information menu position of the “Network Management” window
The “Network Information window” provides information about the network status and the activity of the different active team members.

Example - "Network information" forma. Show here:
· RA9UN at them moment in work mode S&P enters a QSO with OH6AA and his transceiver has the status TX. QSO TX number 123 is reserved for this QSO. This number will be reserved until this QSO is either stored or cleared.
· UT7MA right now has a QSO with RA1QQ in work-mode CQ (Running). His TRX has the PTT status RX. For this QSO the TX number 124 is reserved.
· For PCs in the 5MC network with empty “NewQSO windows” the Callsign field is empty.
Reservation TX-NUM
Reservation TX-NUM
From every PC in the network TX numbers can be reserved for the active QSO using SHIFT+INSERT.
In ESM-mode the TX number reservation is automatically switched on.
- If a callsign is entered into the Call" field of a NewQSO window by any team member a TX number will be assigned and reserved.
- Any other team member working on a new QSO as of that moment will get the next higher TX number assigned.
- After the first click on the ENTER key the TX-NUM is kept to the end of the QSO.
- If the NewQSO menu is cleared the reserved TX-NUM will be accessible to all team members again.
Start-up 5MC and choice
|
Start 5MC - clicking its desktop icon.
|
During the loading process an image will be displayed. |

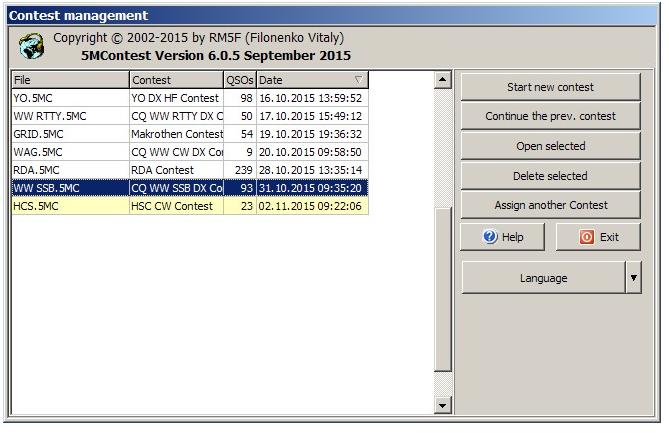
When loading is finished, the contest selection screen is displayed:
|
|
MAIN BUTTONS
· "Start new contest" – Create a new contest log file · "Continue the prev. contest" – Work with an existing contest log file · "Open selected" – Continue working with the last contest log file · "Delete selected" – Delete the selected contest log file · "Assign another contest" – Use the selected log file but reassign the rules and recalculate the score of another contest. OTHER BUTTONS:
- "Exit" - Close the program. - "Help" - Open this help file. "Language" – Select the program’s language.. |
Start NEW Contest
|
With the "Start new contest" button a form to select the specific contest is started.
Clicking a displayed contest name its Contest Rule File is displayed . |
The displayed contest rule files are saved in the folder C:\5MContest\Contests\”Month name”. They are extracted from http://www.qrz.ru and default in Russian language. These definition files can be replaced by the user. The files are displayed for information and available as read only.
· Select the Contest by clicking the “Select Button”.”). |
The “Enter new contest file name” form will be opened. A name for the specific contest’s log file can be entered. Example: ”WW SSB DX Contest 2016”.

Remark:
You can exit this step at any time pressing the ESC-key.
Change Rule-file
All the Rule-files did saved into the C:\5MContest\Contests\Month-name folders. It is from http://www.qrz.ru Default.
You can To replace\load any rules himself.
They are read-only
Macros
MACRO – 5MC can send stored messages to the connected TRXs. They can either be text to be sent over the air or macros. Macros are commands to execute actions either in the program itself or on the connected TRXs.
1. STARTING/STOPPING Stored Messages:
Stored messages can be started
· by pressing Function Keys F1 to F12
· pressing ENTER with ESM on
· automatically with AUTO on
They stop
· when the sending of Stored Message is completed
· anytime when the ESC key is pressed.
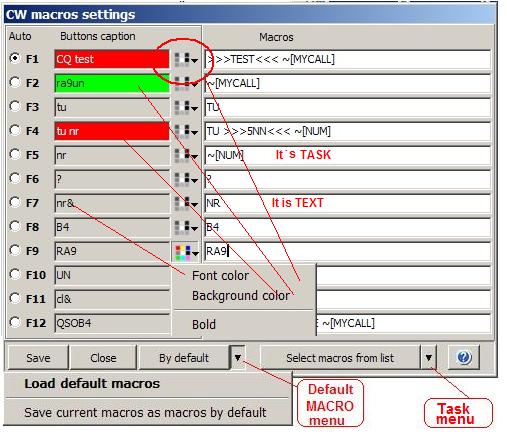
2. Stored Messages consist of either text to be sent or macros to be executed.
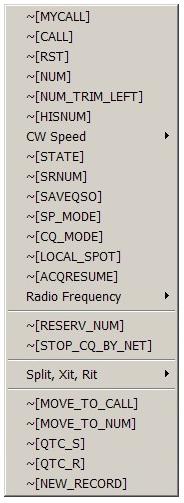
- General Macros are starting with the ~sign and are entered between square brackets ~[ ] Example ~[command]
- CW Speed commands:
- > Increase CW-speed by 5 cpm
- < Decrease CW speed by 5 cpm
- Pure text entered without command symbols is supposed to be sent as text by the transceiver.
Notes:
· 5MC is installed with a default stored messages set. They can be adapted by the user.
· In the soft have macros default. You can himself it's to change
The contents in this section:
2. CW macros
3. SSB macros
4. DIGI macros
See also:
- QTC RX macros for the WAE contest
- QTC TX macros for the WAE contest
Macros Editor
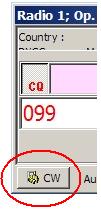
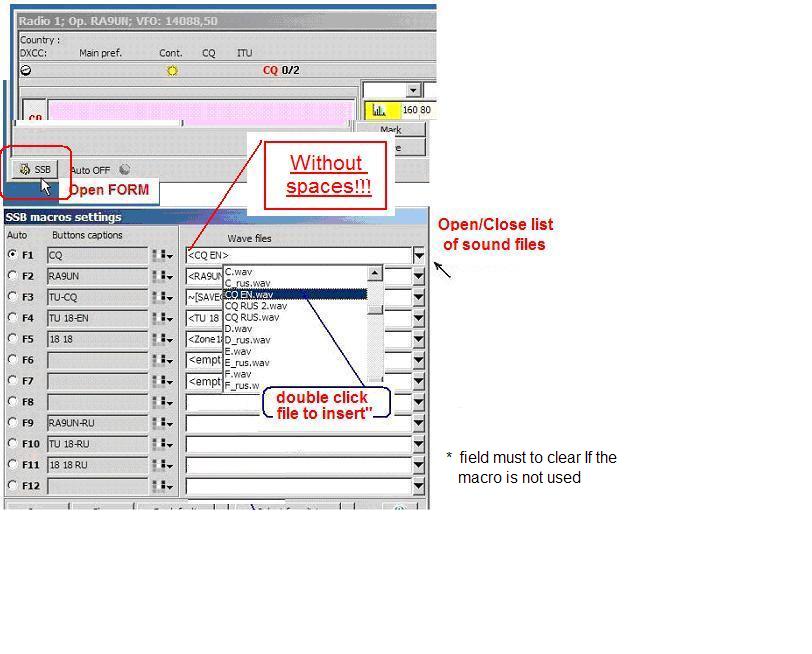
Through Main Menu: „Management“-„SSB/CW/Digi Macro Settings" the window to define and edit macros can for the active mode can be opened.
Optionally it can be called by pressing dedicated button (see image below) in the “New QSO Window” or by pressing Shift+F1 to Shift+F12 or with a Right Mouse Click on the Function Key display of the New QSO window.
An additional macro panel offering 12 more macros that can be started clicking ALT+F1 to ALT+F12 can be opened through Main Menu: “Windows”-“Additional Macros Panel”. These macros can be edited/defined like standard macros clicking Shift+ALT+F1 to Shift+ALT+F12 or with a Right Mouse Click on the Function Key in the Additional Macro Panel.
|
1. Into "New QSO:
|
2. Main Menu "Management" |
|
|
Macro List
|
Will send: |
Info taken from: |
|
Action when transmitted: |
|
Your CALL (Callsign) CALL of correspondent Your RST TX Your full TX Nr Left part of your TX Nr RX Nr
Your exchange number QSO Serial Number |
Station info New QSO New QSO New QSO New QSO New QSO New QSO Station info Auto |
|
(for emergency situations)
Change CW Speed (by 5 cpm)
Save QSO in the log ESM for S&P ESM for Running Local SPOT in the BandMap
continue AutoCQ-Mode Setting selector R1-R2 Frequency
STOP CQ for any operator Setting selector
Start the QTC TX window Start the QTC RX window Start PC Recorder. (Stop if Macro the End.) |
Additional Macros
Form of Additional Macros (Alt+F1... Alt+F12)
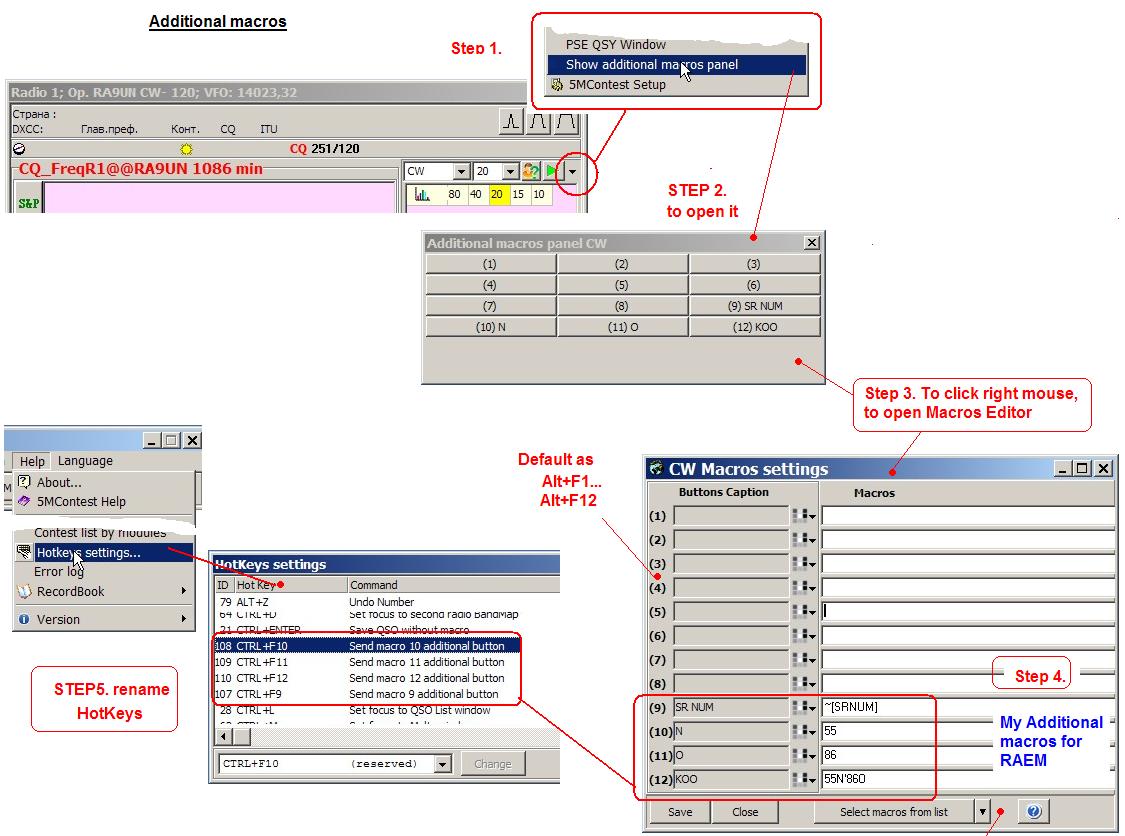
You can to Start it
· from Additional macros panel
· hot keys Alt+F1... Alt+F12
.
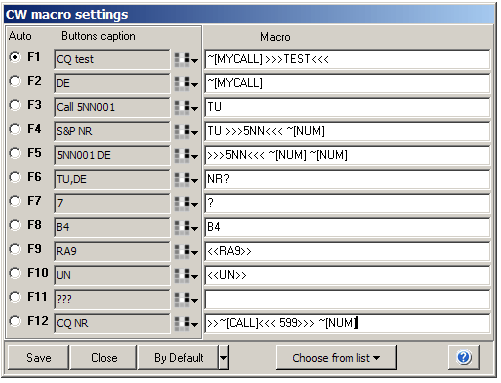
CW macros
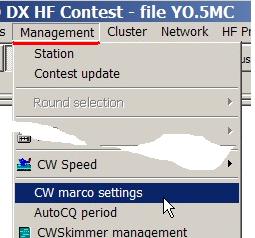
When in the “New QSO” window the mode CW is chosen, through Main Menu: „Management“-„CW Macro Settings" the window to define and edit macros (Stored CW Messages) can be opened.
Optionally it can be called by pressing dedicated button (see image below) in the “New QSO Window” or by pressing Shift+F1 to Shift+F12 or with a Right Mouse Click on the Function Key display of the New QSO window.
An additional macro panel offering 12 more macros that can be started clicking ALT+F1 to ALT+F12 can be opened through Main Menu: “Windows”-“Additional Macros Panel”. These macros can be edited/defined like standard macros clicking Shift+ALT+F1 to Shift+ALT+F12 or with a Right Mouse Click on the Function Key in the Additional Macro Panel.
or:
|
1. from "New QSO: |
2. From Main Menu "Management"
|
|||
|
Enter Sends Messages Mode uses its own CW macros defined through
|
||||
ESM for CW
When the Enter Sends Message Mode is set ON the sending of messages is invoked by just pressing the ENTER key. (with the ESC key the sending can be stopped immediately).
|
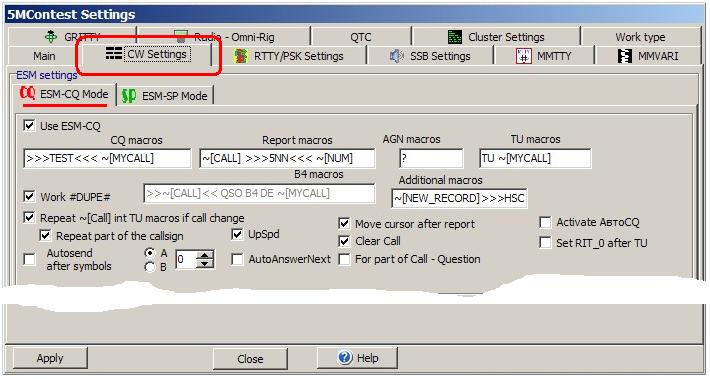
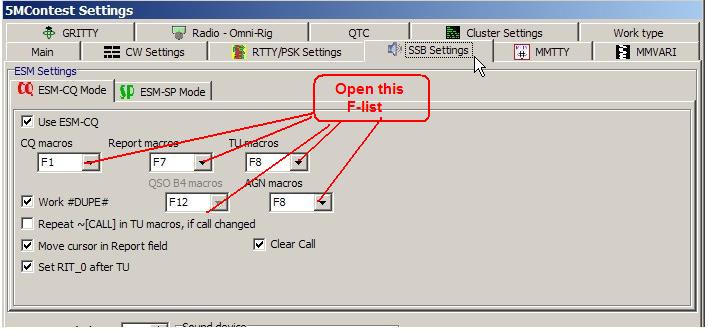
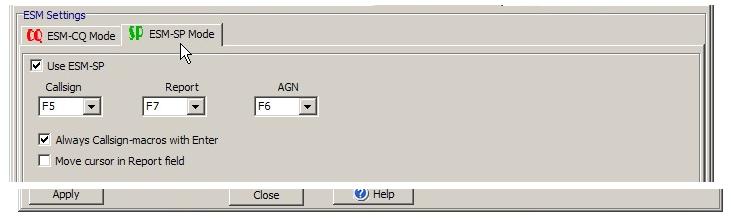
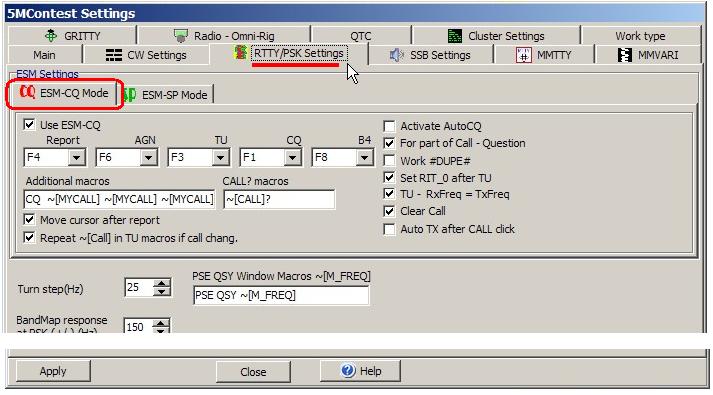
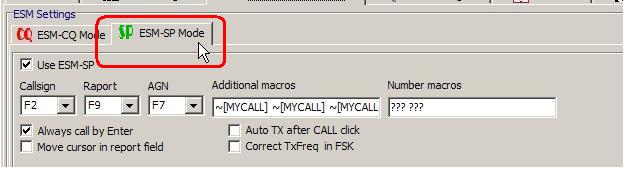
1. To manage the stored messages for ESM (Enter Sends Message) in CQ Mode (Running) for Radio1 and Radio2 open the tab CW settings under Menu “Management” – “5M Contest Settings”
- Select ESM for the CQ (Running) or the S&P mode: Tick “Use ESM-CQ” or “Use ESM-SP” to activate ESM for CQ (Running) or for S&P Mode
In the ESM mode Stored Messages are started depending on the QSO context by just clicking the ENTER key.
The context specific messages can be defined on the ESM setup windows as well as other checkboxes to define the behavior of 5MC after ENTER is pressed in with ESM ON. . |
|
Accordingly when ENTER is pressed the messages are sent to depending on
· active mode (CQ (Running) or S&P)
· and the position of the cursor in the New QSO Windows .
When “Activate AutoCQ” is ticked in the ESM Window for CQ (Running) mode 5MC will repeat the CQ call automatically with the stored message of the chosen F-key for Auto.
1. ESM scenarios for CQ (Running) mode:
|
2. ESM scenarios for S&P:
|
||||||||||||||||||||||||||||||||||||||||||||||||||||||||||||||||||||||||||||||
SSB macros
Phone Macros
Voice messages can be sent
· spoken live by the operator through the microphone,
· using phone macros,
· using a combination of operator live messages and phone macros.
1. Phone Macros
· Sound files for phone stored messages are stored as files with the extension .wav.
· 5MC can only play sound files stored in the folder C:\5MContest\Sound.
· Phone macros consist of either sound files “name.wav” to be played and/or actions to be executed.
· Sound files (.wav files) to be played are called by writing their file name without extension between angle brackets <>. Example: <CQ> to play the file “cq.wav”.
· 5MC macros to be executed are written between square brackets following a tilde sign: ~[ ]. Example: ~[task]
2. PREPARING PHONE MACROS
3. Example: Phone macros for the different function keys for the WW SSB Contest
Look also:
- RX SSB
- TX SSB
PREPARING PHONE MACROS
PREPARING PHONE MACROS
2. PREPARING PHONE MACROS
Full sound messages:
These are sound records to be played in specific situations, e.g.
· CQ (example: c:\5MContest\Sound\CQ EN.wav or UT7MA_UT7MA_Contest.wav)
· my call (example: c:\5MContest\Sound\RA9UN EN.wav OR UT7MA_UT7MA.wav)
· my number (example: c:\5MContest\Sound\ TU 18 EN.wav)
Individually spoken messages:
ESM mode executes defined stored messages automatically when ENTER is pressed depending on the content of the active NEW QSO window.
If in ESM mode, some macros operator will to speak ONLY himself, this Voice macros should be empty.
Spelling sound files:
These are sound records for each letter and number (listen to examples here: C:\5MContest\Sound\ A.wav or 1.wav). They are used by specific macros: [CALL] [NUM] [HISNUM] [STATE] and [SRNUM].These macros when executed spell the content of fields.
Example: ~[CALL] spells the callsign entered into the NEW QSO window.
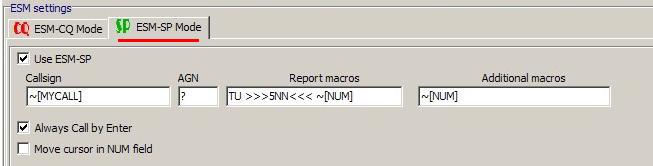
ESM SSB
ESM SSB
ESM for SSB
When the Enter Sends Message Mode is set ON the sending of messages is invoked by just pressing the ENTER key. (with the ESC key the sending can be stopped immediately).
1. ESM configuration for CQ Mode (Running)
CQ Mode: New QSO window situations and reactions to ENTER
|
№ situation |
QSO Situation |
windows of "NewQSO" |
Cursor into Field**: |
Macro to send** |
||||||||||||||||||||||||||||
|
CALL |
RX-Number |
|||||||||||||||||||||||||||||||
|
1. |
Call CQ |
Empty |
Empty |
CALL |
"CQ macro" |
|||||||||||||||||||||||||||
|
2. |
Send own TX Number |
Filled in |
Empty |
CALL |
"Report macro" |
|||||||||||||||||||||||||||
|
3. |
Ask again for RX NUM |
Filled in |
Empty |
RX-Num. |
"AGN macro" |
|||||||||||||||||||||||||||
|
4. |
End QSO |
Filled in |
Filled in |
RX-Num. |
"TU macro" |
|||||||||||||||||||||||||||
|
5. |
QSO Before |
DUPE CALL |
Emtpy |
CALL |
"B4 macro" |
|||||||||||||||||||||||||||
|
2. ESM configuration for S&P mode
S&P Mode: New QSO window situations and reactions to ENTER:
|
||||||||||||||||||||||||||||||||
DIGI macros
DIGI Macros
Digi MACROs may contain text to be sent and/or tasks to be executed by either 5MC or the TRX.
· Tasks are commands included into symbol-the task symbol ~[ ]
Example ~[task]
· Text only: All text in a macro outside of task tags will be sent by the TRX Text Only.
· New Line characters and SPACE will also be transmitted

* Macros- field must to clear If the macro is not used
ESM DIGI
ESM for DIGI
When the Enter Sends Message Mode is set ON the sending of macros is invoked by just pressing the ENTER key. (with the ESC key the sending can be stopped immediately).
1. ESM configuration for CQ Mode (Running)
Digi CQ Mode: New QSO window situations and reactions to ENTER:
|
¹ situation |
Situation (I want to send;) |
windows of "NewQSO" |
Cursor into Box |
Send Macro |
Situation for ESM QSO Maker |
|
|
CALL |
RX-Number |
|||||
|
1. |
CQ |
Empty |
Empty |
CALL |
"CQ macro" |
CQ TEST |
|
2. |
my TX Number |
Filled in |
Empty |
CALL |
"Report macro" |
NUMBER |
|
3. |
PSE RX Number AGN |
Filled In |
Empty |
RX-Num. |
"AGN macro" |
NO NUMBER |
|
4. |
End QSO |
Filled in |
Filled in |
RX-Num. |
"TU macro" |
TU |
|
5. |
CALL? |
Empty |
Filled in |
CALL |
"CALL? macros" |
NO CALL |
|
6. |
Sorry NO QSO |
Empty |
Filled in |
CALL |
|
SRY NO QSO |
|
7. |
QSO Before |
DUPE CALL |
Empty |
CALL |
"B4 macro" |
QSO B4 |
|
8. |
To be defined (INS key) |
|
|
|
“Additional macro” |
|
2. Digi ESM configuration for S&P mode
Digi ESM-situations for S&P
|
¹ situation |
Situation (I want to send;) |
windows of "NewQSO" |
Cursor into Box**: |
Send Macro |
|
|
CALL |
RX-Number |
||||
|
1. |
My CALL as answer |
Empty or Filled in |
Empty |
CALL |
"Callsign" |
|
2. |
my TX NUM and TU |
Filled in |
Filled in |
RX-Num. |
"Report macros" |
|
3. |
Ask again RX NUM |
Filled in |
Empty |
RX-Num. |
"?" |
|
4. |
To be defined (INS key) |
|
|
|
“Add. Macro” |
4. key INSERT - start "Additional macros" (For Your fantasy)
DIGI
5MC supports both DIGI modes RTTY or PSK
RTTY can be done using FSK or AFSK.
PSK uses the PC’s soundcard.
|
START DIGI
|
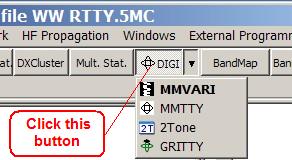
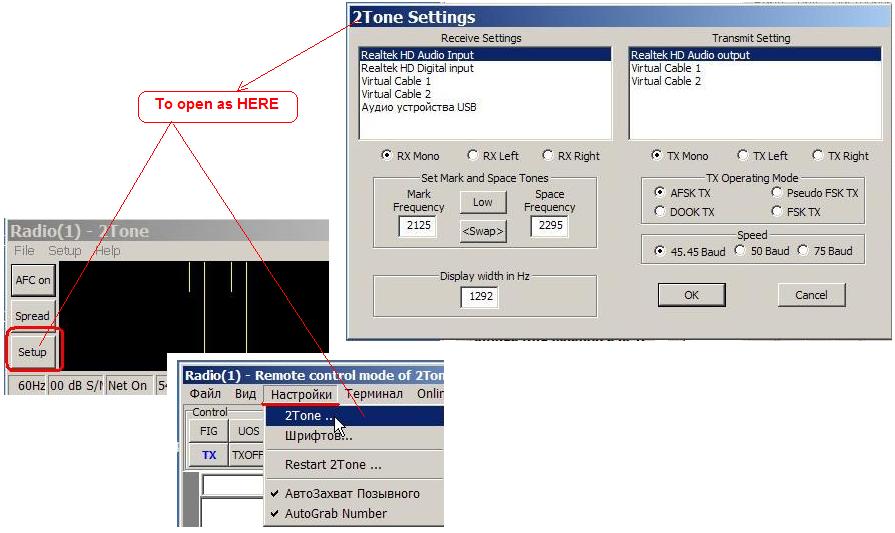
For DIGI 5MC offers a choice of engines. · MMVARI – for RTTY and PSK. 5MC integrates it extending it with additional features. · MMTTY – for RTTY only. It is integrated as is. · 2TONE - for RTTY only. It can be used in combination with the other engines. |
||
|
|
The digi Window can also
Select the digi engine and |
||
 - DIGI
DIGI Engines
For DIGI 5MC offers a choice of engines.
· MMVARI – for RTTY and PSK. 5MC integrates it extending it with additional features.
·MMTTY – for RTTY only. It is integrated as is.
· 2TONE - for RTTY only. It can be used in combination with the other engines.
5MC DIGI engine windows
5MC uses two different windows to support digi.
1. The DIGI RX Window showing the QSO text. It is similar independent is the chosen engine.
2. The DIGI Display allowing to tune the radio signals .Depending on the chosen engine this window is different.
Both windows open when DIGI is selected.
These windows are closed by clicking close on the status bar of the activated DIGI RX window (blue).
RX Window
Digi RX Window (example based on MMVARI engine)
|
Status Bar (blue = active)- Menu -
Control Panel -
Macro Panel - Info Bar |
|
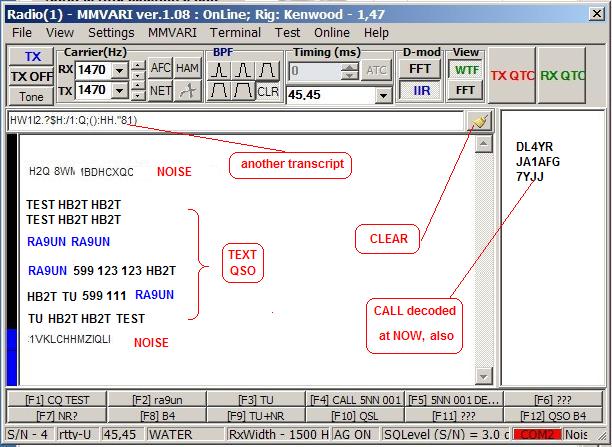
The fonts and colors of the DIGI RX window elements can be changed in the settings for the DIGI engine used under Menu “Management” – “5MContest Settings”.
DIGI Display
5MC allows to use different DIGI engines displays. DIGI engines differentiate by
· their ability to copy weak signals,
· features to automatically copy and display callsigns,
display of the frequency spectrum.
DIGI Display Description and Settings for the different engines supported by 5MC:
GRITTY DIGI Display
MMVARI
The MMVARI DIGI engine can be used for PSK and RTTY (AFSK or FSK). In 5MC’s Advanced View the MMVARI engine is extended with additional features developed by the author of 5MC (selected in the MMVARI RX Window Menu: “MMVARI” – “Advanced View”).
More information about MMVARI:
Displays MMVARI
MMVARI DIGI Display Views
|
When MMVARI DIGI Engine is opened 5MC opens automatically the MMVARI DIGI RX Window and the MMVARI DIGI Display.
2. MMVARI DIGI Display Advanced View
Example: MMVARI DIGI Display Advanced View used for PSK EXAMPLE: Display for PSK |
5MC offers two different DIGI Display views for MMVARI
1. MMVARI DIGI Display Standard View
|

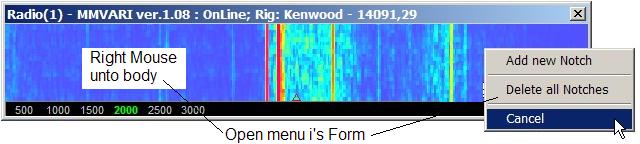
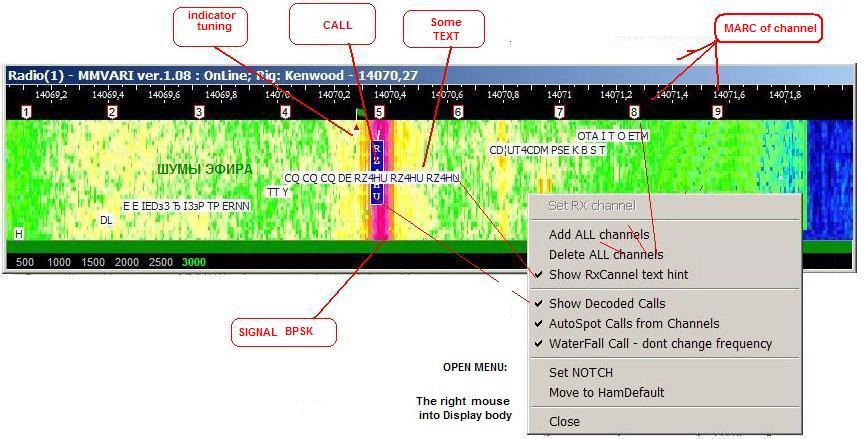
Exact Tuning to signal is carried out until alignment marks of the indicator tuning and signals:
· Tuning transceiver's volkoder for to install for it.
· Click left mouse between signals-lines. (For PSK - on Lines) It method can may in AFSK only.
'MMVARI" Menu
|
MMVARI Menu position “MMVARI”
|
Menu Block: Waterfall functions
Menu Block: Digi Display Advanced Functions Settings
Menu Block: Show Advanced QSO info in the waterfall
Mode Selection
Menu Block: Selection of Auto functions
Menu Block: MMVARI Display Selection (Standard/Advanced)
Standard View Color Settings |

Engine Settings

1. HAM Default – Set to ON for FSK
2. Max RxCh – Not more than 10
Display Color
1. Setting Volume Colors for the MMVARI DIGI Display’s Advanced View
(5MC Menu: 5MContest Settings-MMVARI-Radio1/2-Color Settings)
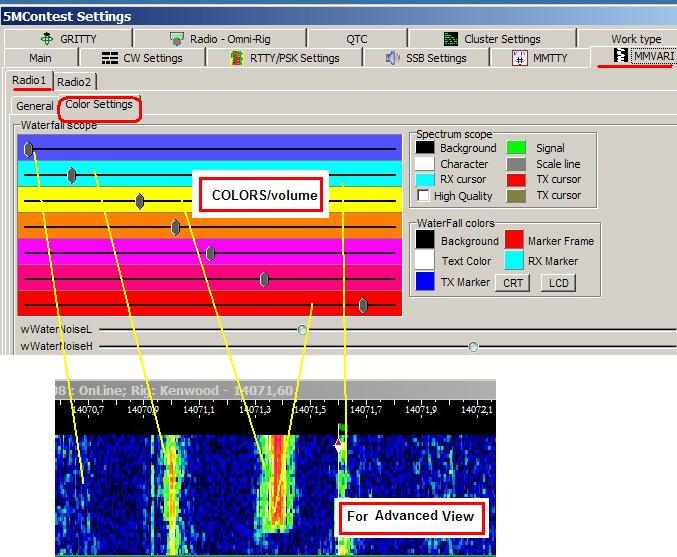
2. Setting Volume Colors for the MMVARI DIGI Display’s Standard View
(MMVARI Menu: MMVARI-Advanced Settings)

MMTTY
MMTTY can be used for RTTY (FSK or AFSK).
The standard MMTTY DIGI Display has no frequency indicator.
|
Two options to open the MMTTY DIGI Engine:
When the MMTTY DIGI Engine is selected 5MC will open the MMTTY RX Window and the Standard MMTTY DIGI Display
Clicking the close button in the activated MMTTY RX window both MMTTY engine windows will close. |
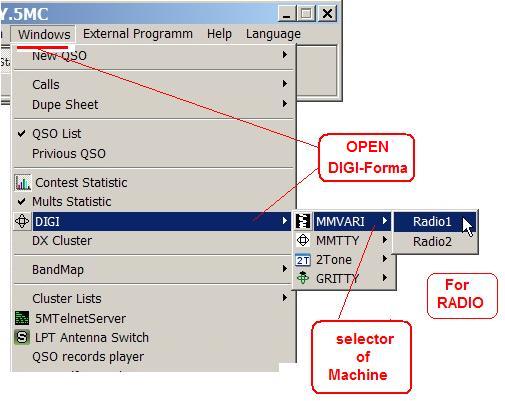
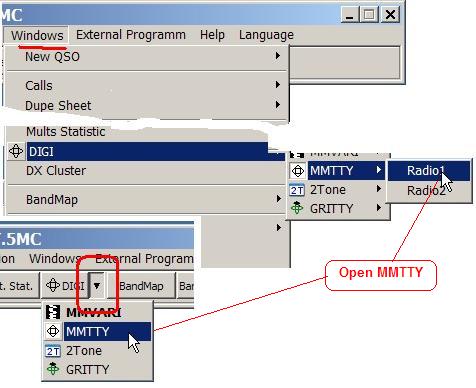
1. From the 5MC Main Menu: “Windows-DIGI-MMTTY-Radio1/2)”
- The assigned “New Radio Window” must be selected (Radio 1 (default) or Radio 2)
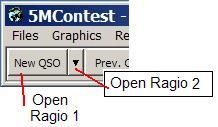
2. Clicking „DIGI“ on the 5MC Main Button bar |
MMTTY Display
1. For the MMTTY engine 5MC provides an additional waterfall/spectrum display. It is opened via MMTTY RX window’s menu: “View”-“Show Advanced MMTTY Waterfall/Spectrum”.

2. Per default MMTTY offers a standard DIGI display

To tune a station signals it must be aligned with the tuning indicator marks:
· by tuning the transceiver's VFO
· by clicking the left mouse button with the cursor positioned between the signal’s lines for the advanced MTTY DIGI display or on the left signal line in the standard MTTY DIGI display. This method only works with AFSK.
Setting MMTTY

Setting MMTTY-2
MMTTY Engine Settings (MMTTY RX Window Menu „Settings“-„MMTTY“)
1. Sound Card selection
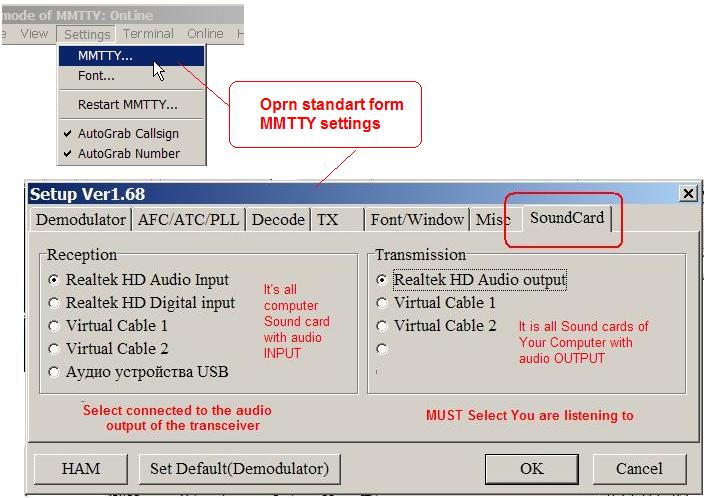
2. FSK & PTT port selection

1) From the C:\5MContest\RE2EXTFSKPlace the EXTFSK.DLL and RE2EXTFSK.ini files into your MMTTY folder.
2) Edit the RE2EXTFSK.ini file:
[PTT port]
Number=6 <--- put your PTT port number here
[FSK port]
Number=8 <--- put your FSK port number here
3) Run MMTTY and open the "Options" - "Setup MMTTY" menu.
4) Choose the "TX" tab, select "EXTFSK" in the "PTT&FSK" drop-down menu.
5) Choose the "Misc" tab and select "Sound+COM-TxD(FSK)" in the "Tx Port" area.
6) Press OK.
Last version http://www.rigexpert.com/index?f=downloads
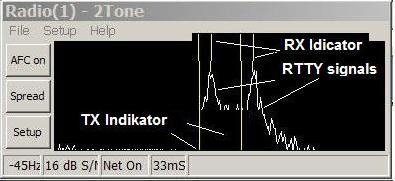
2TONE
2TONE can be used for RTTY (FSK or AFSK).
The 2TONE DIGI Display has no frequency indicator.
2TONE Display
2TONE Display
To open the 2TONE DIGI Engine:
|
|
|

Opening the 2Tone DIGI Engine opens immediately the 2Tone RX Window and the 2Tone DIGI Display.
The 2 Tone DIGI Device and its two windows are closed clicking the close button in the activated 2Tone RX Window.
2TONE Setting
Form for 2TONE Setting:
DIGI operation automation
|
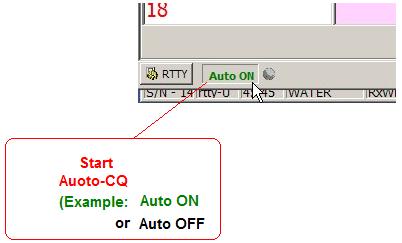
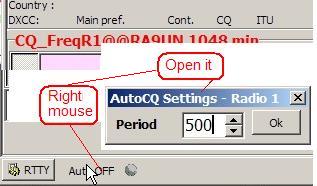
1. Auto-CQ: From Radio 1(2) New QSO window · On/Off: AUTO button mouse left click” |
· Auto-CQ period setting: AUTO button mouse right click
|
||
|
|
2.Auto Capture of Call and Exchange
Capture Call Capture RX NUM Start the callsign Macro after Call capture Auto answer NEXT CALL after QSO
DANGEROUS FUNCTION! The TX must be kept under control |
||
.jpg)
Full AutoCQ
Fully Automated DIGI operation
DIGI QSO Maker - DIGI Auto Operation
.jpg)
|
QSO Maker Window To open from 5MC Menu: Help-DIGI ESM QSO Maker |
|
- Ticker - Answer Next
- Wait time after CQ
- Wait time after Exchange
- Wait time after TU
- Noise reduction level |

This mode allows the operator to let the PC run the operation for a few moments.
5MC will use the macros as defined for DIGI ESM
QSO Speed will not be as high as with manual operation and the operation can easily fail.
DANGEROUS FUNCTION! The TX must be kept under control
Cluster & Spots
Cluster - Free Source of information about stations working at now. It is as some servers of internet.
SPOT - Free Information about of each radio station
the origin of the spots:
- operators of radio stations (in the text as Cluster-Spot)
- CW Skimmer (in the text as Skimmer-Spot)
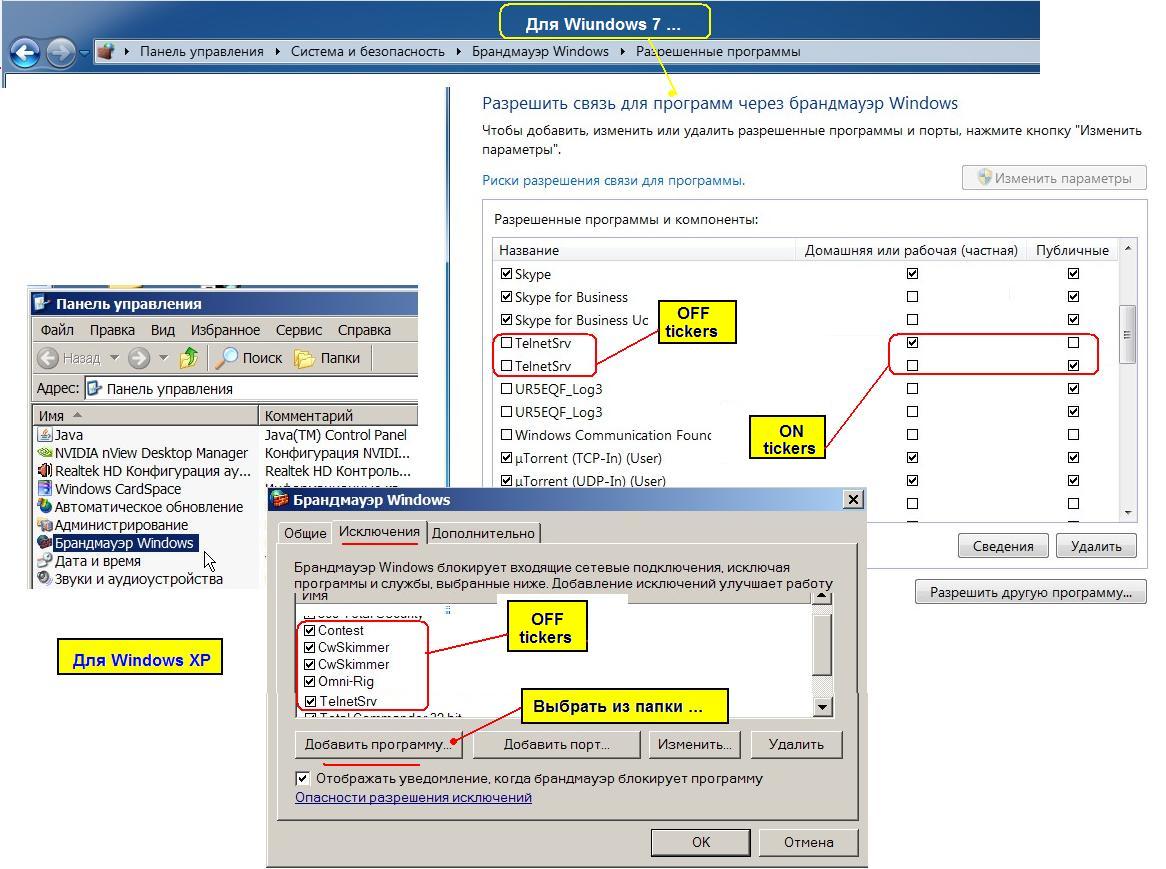
To reduce the problems to Spots receive, it is Recommended to ELIMINATE the effect of the Windows Firewall for the program 5MC and TelmetSrv
Spot filters
The enourmous mass of incoming spots can cause 5MC or the PC to freeze. For this reason the number of spots provided to 5MC should be limited to the minimum needed by filtering them by band, spotter, mode, …
There are several options to filter spots. 5MC supports several ways to filter spots. Filtering the spot acquisition on the server is preferable since it does reduce the number of spots arriving on the PC.
1. Filtering the spot acquisition on the server (server filter method – working with ARCluster spot servers)
· Cluster Spots
· Skimmer Spots
2. Filtering all arriving spots within 5MC (local filter method)
These filter settings are applied to all types of incoming spots. This method does not reduce the workload for 5MC.
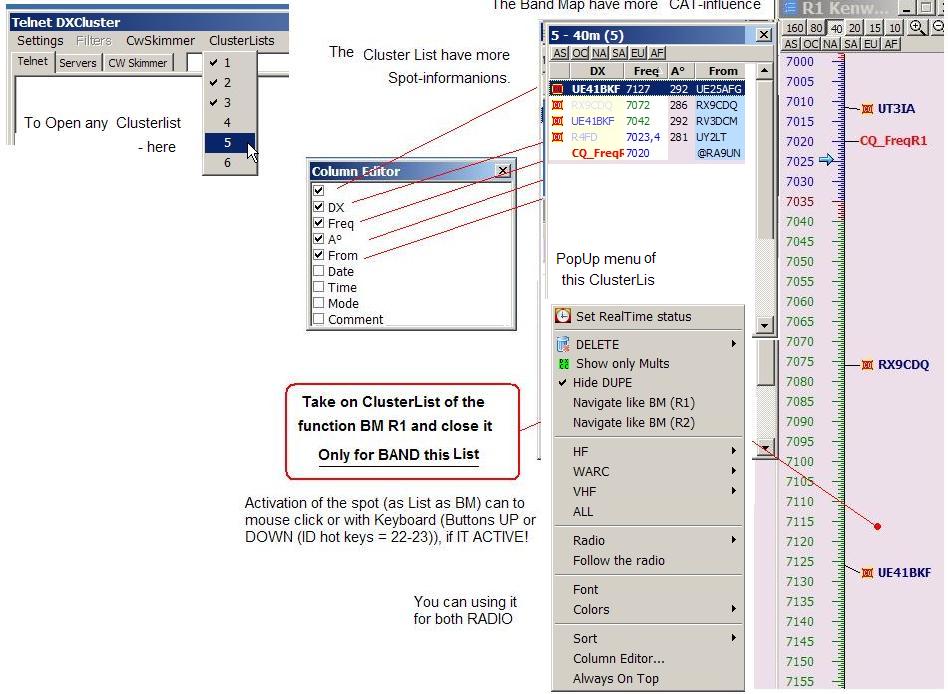
3. Filtering the spots displayed on the local PC through
· Band Map
· Cluster List
All these methods can be combined.
TelnetServer
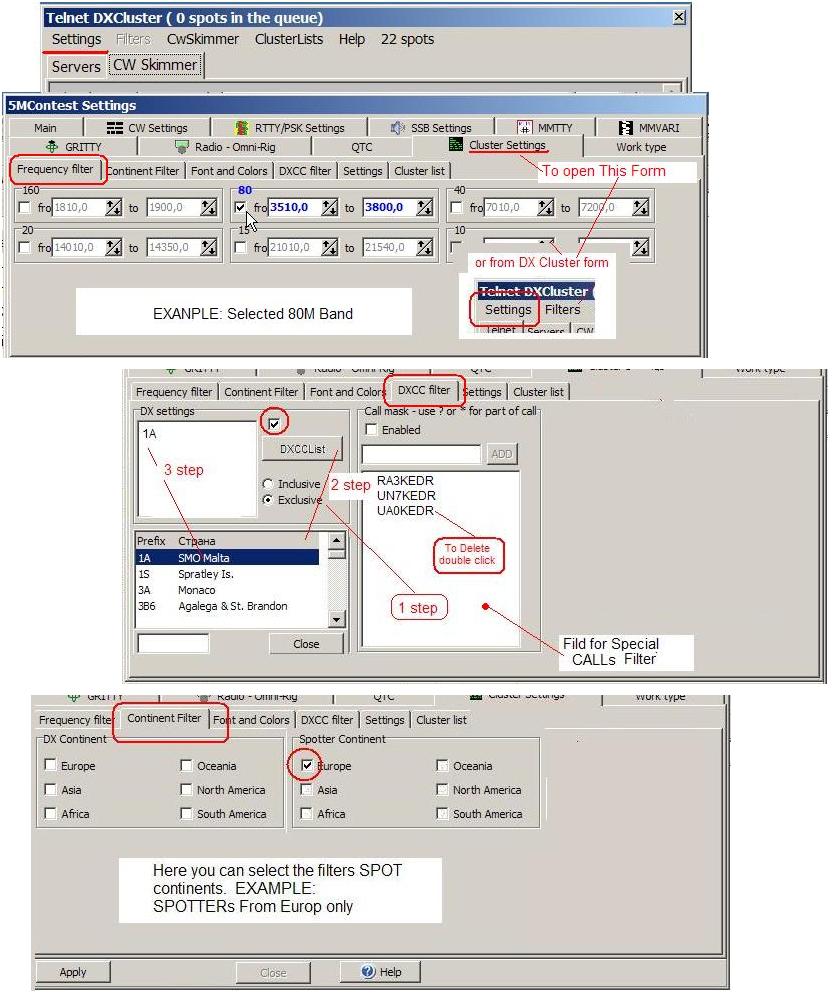
It is recommended to filter spots on the servers (filter method 1) to the extent possible. This reduces the number of spots arriving at 5MC and takes like that load of the PC.
Menu for to open:
- Setting as click forma the Cluster Setting
CWSkimmer - Some for owner (If You have it)
ClusterList (To open List №) and menu thr Control Your
Local filter method:
Settings via:
· TelnetServer Forms of filters,
· Main Menu – “Management” – “5MContest Settings” – Tab “Cluster Settings
Server selection
This 5MContest TelnetServer Server Filter settings window is opened clicking the Icon of the 5MTelnetServer application in the windows taskbar once 5MContest is started. The 5MTelnetServer application is started automatically when 5MContest is started.
Spot Server Profiles:
|
Before spots can be received spot servers (Clusters) must be selected. |
|
The Server Filter method uses AR Cluster Filter commands to control the filtering of spots on the Cluster Server. To make use of this very helpful feature AR Cluster Servers must be connected. Through AR Cluster Servers both types of spots – cluster spots and skimmer spots – are made available. Through 5MC the filters on AR Cluster Servers can be managed. 5MC like that allows also to apply Spot Quality Filtering on AR Clusters.
· DL4RCK - a main source for qualified AR Cluster DIGI Skimmer spots. Ideal for DIGI contests
· TELNET.REVERSEBEACON.net - the main source CW & DIGI Skimmer spots. Interesting for CW or DIGI contests. These spots cannot be filtered through 5MContest Server filters and should normally not be used directly since their spots are made available to 5MContest through distribution cluster servers (AR Cluster and CC Cluster). AR Clusters are the clusters of choice for 5MContest users since their filters can be set from 5M TelnetServer directly, including Spot Quality filtering.
· OTHER SERVERS – cluster servers delivering cluster and/or skimmer spots. Preferably AR Cluster servers are used since the server filtering of 5M TelnetServer does not work for cluster types like CC cluster or DXSpider.
· Spots from own Skimmers can be integrated using their LOCALHOST addresses.
Skimmer Spot filters
This window controls the skimmer spot filtering of REVERSEBEACON.net ONLY
Important features:
· If the ticker for “Enabled Skimmer filter” is not selected
· , skimmer spots are not filtered (all skimmer spots arrive at 5MC).
· With the boxes "Allowed bands" and "Allowed spotters" spots from specific bands and spotters can be selected. Clicking bands or spotters in available bands or active spotter list selects bands/spotters for filtering, clicking bands/spotters in the allowed bands/active spotters list deselects them.
· Ticker “Allowed Spotters”:
If “Allowed Spotters” is ticked, only spots from spotters in the allowed spotters list are selected. It this ticker is OFF, spots from all spotters arrive at 5MC. If it is ON and the Allowed Spotters list is empty, not skimmer spots are passed to 5MContest.
Cluster Spot filters NEW
This window controls the cluster spot filtering of connected AR Cluster servers (spots with an originating call NOT marked with #).

· When “Enabled Cluster Filter” is ticked, only spots fulfilling the selection criteria are passed to 5MContest.
· If “Enabled Cluster Filter” is NOT ticked, the server will send all cluster spots to the PC.
· "Frequency Filters" allow to select passed frequency ranges and is more granular than "Allowed bands" selections.
· "Callsign mask" allows to select specific callsigns to only be passed, e.g. to just pass calls from active DXpeditions.
Cluster Spot filters OLD
Local Cluster Spot filters (filtering any spots arriving on the PC with 5MC)
Menu “Management” - "5MContest Settings" Tab: "Cluster Settings".
Using the Tabs Frequency / Content / DXCC Filter all incoming cluster spots (cluster and skimmer spots) can be filtered.
SDR & 5MC
5MC can integrate SDR equipment if it is supported by OmniRig List Or PowerSDR program. Using the program CWSkimmer SDR radios can be used as local spot servers.
.
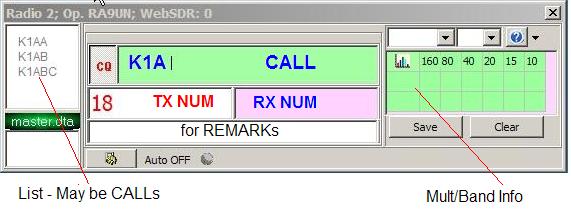
Spot and Band Map
1. Spot - Information about CQ-signals. It have:
· CallSign CQ-station
· Frequency CQ-station
· How is spotter
2. The tool Visualization of the SPOTs and to take its.
· Band Map - main tool. Have large potency for CAT
· ClusterList - auxiliary tool. Have large information about SPOTs
3. For using spots MUST You to have:
· CAT interface
· The Internet connection at all time contest
Spot
Spot - Information about CQ-signals.

SPOT-Information:
· CallSign CQ-station - will AUTO use for QSO process
· Frequency CQ-station - will AUTO use for transceivers frequency
· How is spotter
From the source of information SPOTs can be:
1. Internet Spot - From publicly information systems
2. Skimmer's Spot -From publicly or personal Skimmers
3. Local Spot - It doing Yourself and for Yourself only
4. SelfSpott - From Yourself about You. The rules forbid it
topic_Dx_cluster
DX Cluster - DEVICE as source of all spots
Activation of the spot is in Band Map or Cluster List may to mousse click or with Keyboard (Buttons UP or DOWN (ID hot keys = 22-23)), if IT ACTIVE! .
Internet Spots
Internet Spot - From publicly information systems. You can to receive and send it Auto or Hand.
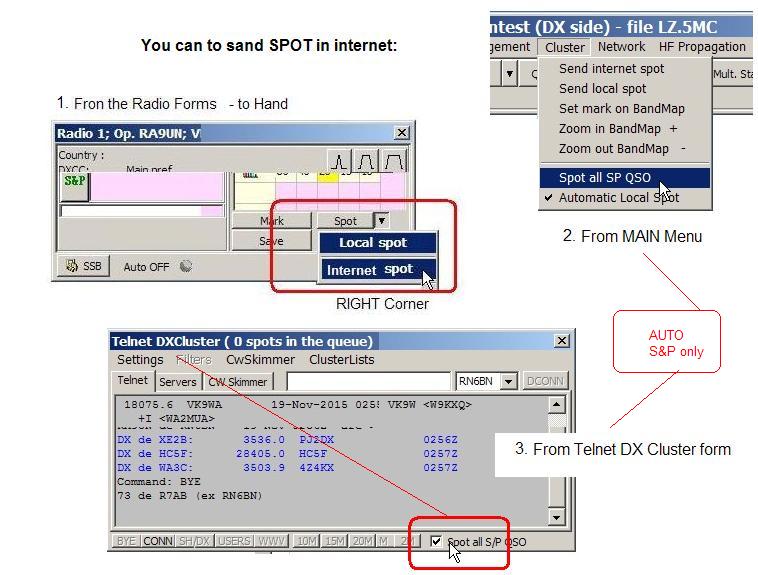
View and handle the spots may on Band Map and Cluster List
Device to get internet spots - Telnet DX Cluster.
Internet Spot Filters
Local spot
Local Spot - It doing Yourself and for Yourself only
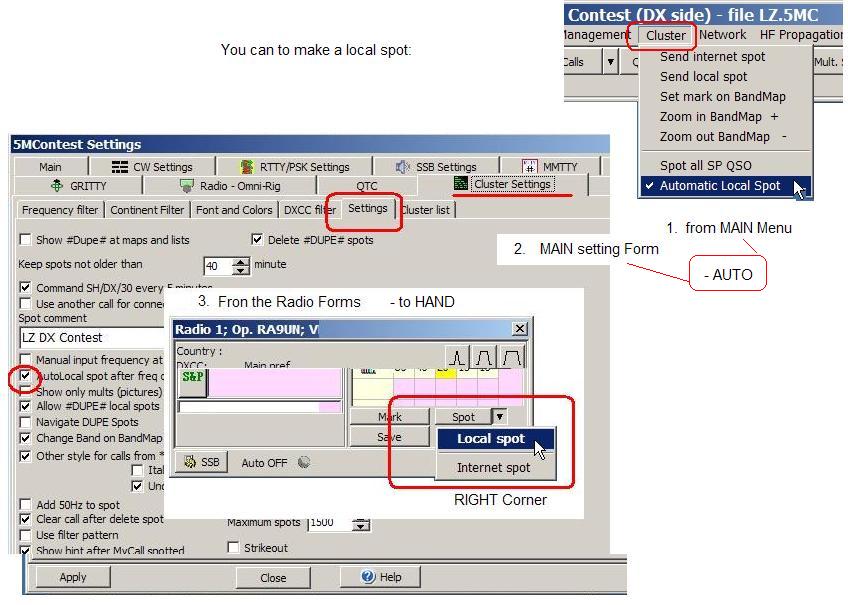
View and handle the spots may on Band Map and Cluster List
Skimmer's Spot
Skimmer's Spot - From some Skimmers:
· Public - Publicly internet Skimmer Servers
· Personal - Owner SDR-radio with Skimmer.
That's against the rules to have a receiver next 300 m.
Band Map
|
|

Wheel mouse, you can:
· to change step of range scale
· move into body
Band Map Design
Activation of the spot can to mouse click or with Keyboard (Buttons UP or DOWN (ID hot keys = 22-23)), if IT ACTIVE!
ACTIVE:
· CallSign CQ-station will AUTO using for QSO
· will AUTO setting for transceivers frequency
i.e. to write and twist - nothing
DX Cluster - the source of all spots
topic_BM_FC
Font and Color
Setting for Band Map Design

Cluster List
Contesting
Important!
Principal duties of the operator:
· to hear/to read the correspondent signals and write Callsignals and control numbers.
· transmit to Your info.
Before beginning of the contest, needs to fill the Windows forma "Station"
In this HELP-folder have books:
· Receive
· Transmit
· WAE
· VHF
-
Finding of correspondents
Finding of QSO partners is the main task of the operator and can be done the traditional way using the TRX’s VFO, RIT adjustments, …
5MContest supports finding QSO partners with the following features:
- Band Map - Displays the calling stations on the selected band (Spots) interfaced with CAT control.
- DX Cluster Enables 5MC to receive dx spots.
- CW Skimmer – Allows to receive spots from own SDRs.
- CW Self control window – supports exact CW frequency tuning
· PSE QSY window - allows to direct QSO partners to other bands
· CAT window – support PC based frequency tuning and TRX control
These features support the operator’s work in all modes and facilitates RX and TX work. Independent of all the operator support 5MC can provide to the operator, it is the operators skill and experience which is the key success factor in ham radio contests.
QSY job
1. Open the “PSE QSY Window” to offer qso partner’s to a QSO on another band – Menu “Windows-PSE QSY Window”.”
This will send "PSE QSY" plus 2x the offered frequency frequency.
2. Entering the frequency into the Call field of one of New QSO window 1 or 2 followed by the ENTER key will change the frequency of the TRX.
3. To quickly change the frequency within the same band only the last 3 digits need to be typed into the Call Field.
Keyboard TRX control
1. Through the “CAT Data Window” the TRX can be controlled from the keyboard and mouse.
2. The TRX Frequency can be controlled from the keyboard using
· Hot Key (ID=71, 72) Example: SHIFT+LEFT (ID=72) will move TRX frequency up 50 Hz.
· With the cursor on CAT DATA window’s frequency indicator area the frequency can be adjusted with the mouse wheel.
Setting step of tuning HERE:
Real Transceiver Frequency displayed here (New QSO Window)
3. In the New QSO windows Transceiver Frequency, Band and Mode can be changed::
· Change Band
· Change Mode
Receive
When receiving QSOs the most important role is the one of the operator. Personal skill and experience are the most important ingredient for success. Searching QSO partners and receiving messages is carried out by the operator. This information is the input typed into 5MC using the keyboard or assisted with some automation. 5MContest mainly reduces tedious routine work collecting all QSO info.
In this chapter:
- Search of QSO partners – 5MC support to find QSO partners
- "New QSO" window.
- CW RX
- SSB RX
- DIGI RX
- Autoinput – automation support for entering QSO information into Call and RX-NUM fields.
- QSO List window
- Log Editor – QSO data stored in the log. Example: Cabrillo
- Statistics windows – 5MC contest Statistics
- DIGI RX – working with the different 5MC windows supporting DIGI operation.
- QSO Audio Recording – using 5MC to record the contest QSO audio.
- CW Tuning Support – 5MC’s visual CW tuning support to tune to the exact frequency of QSO partners
Form New QSO
Open the NEW QSO Window to enter and log the information about the current QSO.
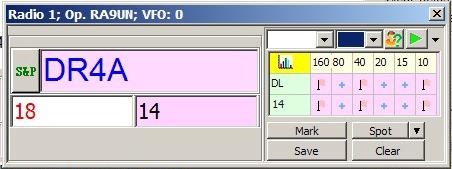
There are two versions of the New QSO window: The full version and the short version. The short version of the NEW QSO window can be displayed by draging the the botton margin of the New QSO window up to make the macro buttons invisible.
|
2. Sort Version
The MultiBox displays how the currently entered QSO counts regarding multipliers: · Flag –the call’s multiplier is needed on the band. · Cross – the call’s displayed multi has been worked on the band. The symbols for the currently active band are highlighted (enlarged/bold) |
|
- for Windows info
- to repair CW keying issues
- auto Answer for Next ALL
- to open form for Next CALL
Menu block: Visualization of the elements of the short window version (without
- open the PSE QSY and add. Macros windows (without |


additional forms QSO
To work with a second radio (SO2R, SO2V, Radio 1 & SDR) a second "New QSO" Window is available.The examples shows the full form with some of the elements hidden (Macro Keys are hidden by reducing the vertical size of the NewQSO windows).
|
|
1. "New QSO" Window for Radio 1
|
|
|
2. "New QSO" Window for Radio 2
|
3. Menu of the New QSO Window for Radio 2
|
|

· CALL and RX NUM can be entered by keyboard or/and automatically.
· Clear all fields – Press the "Clear" button or the ALT+Q ( HOT KEY ID=14)
· You can only clear specific fieldsNUM/Call/Current Field - HOT KEY (ID=94-96)
· While the QSO is not logged, the deleted record can be restored - ALT+V, ALT+Y, ALT+Z (HOT KEY ID=78-80)
· Date and Time fields are hidden in the NewQSO2 window. Their content is still written into the log.
· "Date" - hidden Combo Box to enter QSO Data**
· "Time – hiden ComboBox to entert QSO Time**.
See also: QSO entry automation support (AutoInput)
AutoInput
For Digi Contests the Input for the CALL and RX NUM field can be automatically captured. Look HERE
For CW & Phone contests there are several autocapture entries:
I. CALL Auto-input from Band Map or Cluster List
1. Click with the left mouse button on the needed Callsign in the BandMap for the New QSO Window. Example: Clicking on W2RLK
2.Pressing UP or DOWN Key to select a Call in the Bandmap.
This only works, if
· the cursor is positioned in the New QSO’s CALL field,
· the BandMap is activated.

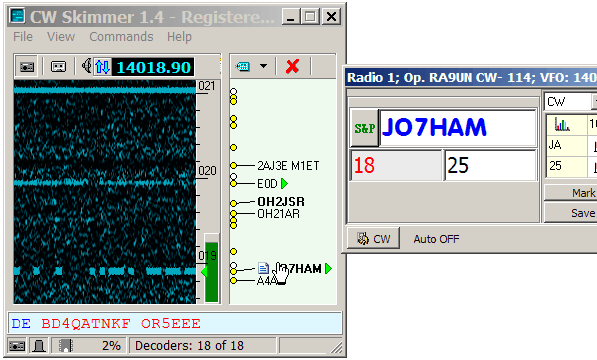
II. Call Auto-input from CW Skimmer
1. Click with the left mouse button on the needed Callsign in CWSkimmer window. Example JO7HAM
2. Pressing UP or DOWN key to select a Call in the CWSkimmer window.
This only works if
· the cursor is positioned in the New QSO’s CALL field,
· the CWSkimmer window is activated.
III. CALL Auto-input from the "Calls" window


1. Click with the left mouse button on the needed Callsign in the Calls window. Example: W2RL
· the cursor is positioned in the New QSO’s CALL field,
· the Calls window is activated.
IV. RX-NUM Auto-input from a Contest Help File. Example: 05
|
· Select "Load Master.DTA file” to provide the Calls Window with data · Select “.HLP” for RX-NUM guessing.
Example - Helvetia.hlp supporting the Helvetia Contest
|
Select "Substitute from HLP file" and to enable the operator to immediately overwrite the substituted entry manually select “Select number”. This will preselect the whole RX-NUM content and typing into the field immediately replaces its content.
|

Warning: Information from Contest Help Files can often change from year to year. There is no guarantee to get the correct values inserted. It serves only as a listeninig guide and as an entry draft. It needs to be carefully controlled by the operator.
CW RX
For CW work need to know Morse codes and Keyboard.
1. To visualize the QSO partner’s frequency and exactly tune to it, 5MC’s “CW self-control” window can be used.
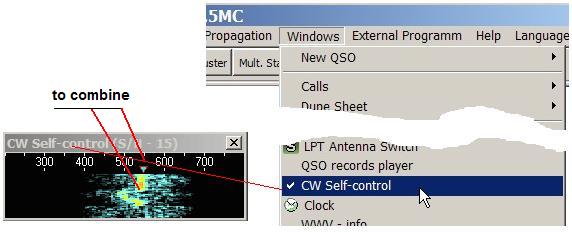
· Set the pitch of your transceiver, e.g. 550 Hz, to set the tone marker.
· Change the transceiver’s frequency to align the QSO partner’s signal the tone mark in the waterfall.
2. Settings width of the CW-filter for buttons on the Radio-1 Forms

about Search correspondents - HERE
SSB RX
For SSB work need to know English alphabet to Spelling, numbers and Keyboard.
- about Search correspondents - HERE
DIGI RX
For DIGI work need to know English alphabet, numbers and Keyboard.
- about Search correspondents - HERE
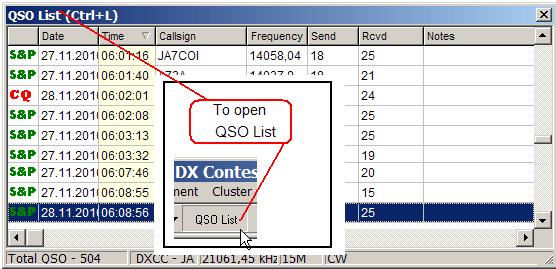
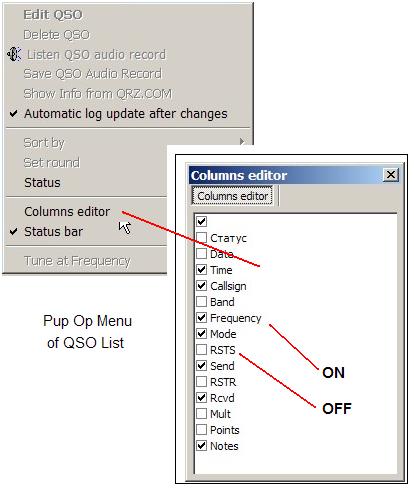
QSO List
The QSO List Window shows all the QSOs of a contest and allows browsing and editing them..
It can be opened from the 5MC main Menu “Windows – QSO List or via the 5MC Button Bar (3 line of 5MC window)
|
The colums editor allows to hide any colums. The column width can be configured with the mouse as in any spreadsheet application.
· See also: How to edit QSOs · QSOs with the same QSO partner are also displayed and edited in the "Previous QSOs" window. |
|
Log Editor
To open the "Edit QSO" window double click the corresponding line in the QSO list (or in the “Previous QSO” list.
Example: LY7M

The speaker symbol shows whether the QSO was recorded as Audio File. Clicking it will play the QSO audio.
See also: How to play QSO audio records.
Audio Recording
5MC have some Methods:
Method №1 - Double clicking the corresponding QSO line in the QSO list (or the “Previous QSO” list) and clicking the Speaker symbol..
.
Method №2: Opening the „QSO records player“ window, selecting a QSO and pressing the Play button.
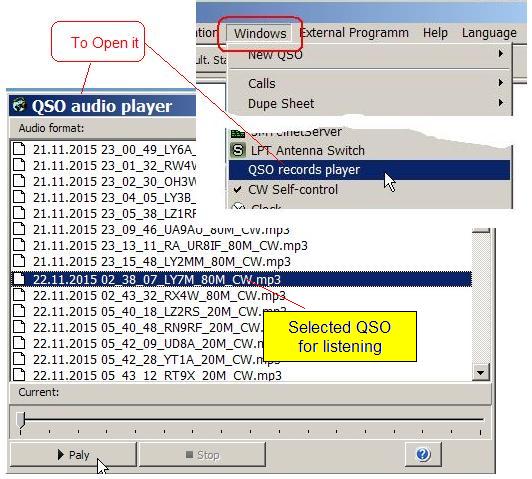
Method №3:Double clicking audio files in the RECORD folder of the 5MC installation directory using Windows Explorer.
Transmit
QSO Messages can be sent in different ways. Standard contest exchanges are sent using Macros.
They can be started from the computer keyboard:
- General macros are started pressing the F1-F12 keys
- Additional macros can be started using ALT+ F1-F12 (Hot Keys 99-110).
When using ESM mode pushing ENTER will call macros depending on the QSO context.
To send custom text messages the CW or Digi Terminal can be used.
Read more here:
- CW-TX
- SSB-TX
- DIGI-TX
TX tuning
Optimal tuning to the QSO partners’ frequency is key. 5MC supports exact tuning to the RX frequency through the CW Self-control window.
CQ S&P
In ESM Mode (Enter Sends Messages) depending on whether in CQ or in S&P mode for SSB, CW and DIGI 5MC will send New QSO window context based QSO messages. ESM can be enabled individually for SSB/CW/DIGI mode and for each by CQ/S&P work mode – Main Menu – 5MContest Settings – Tab SSB Settings/CW Settings/RTTY/PSK Settings.
Switching between CQ and S&P mode can be done from the New QSO Windows.
|
1. Manually: : Toggling between CQ/S&P mode clicking the CQ/S&P button.
2. Automatic CQ mode switching: Clicking F1 or the F1 button to play the CQ message.
|
|
3. Automatic S&P mode switching: If the TRX frequency is changed by more than 200 Hz, the mode will change to S&P. |
|

3. CQ Answer for NEXT
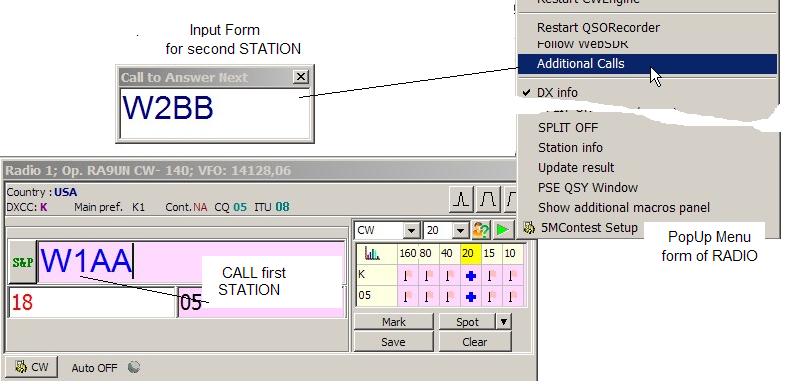
Call signs can be entered into the “Call to Answer NEXT” window. Calls entered in this window are automatically entered into the CALL field of the active QSO window, once the active QSO has been logged. In the example the SECOND CALL (example - W2BB) will be put into the Call field after the QSO with the FIRST Call (W1AA) is logged or the “New QSO” window is cleared.
The “Answer Next” Window is opened either through the “New QSO” Window PopUp Menu or by pressing the key assigned to Hot Key=113.
More information about ESM situations and ESM work-methods can be found following the links below:
- for CW
- for SSB
- for DIGI
CW TX
5MC lets operators the choice between manual keying or sending CW messages from the program.
How to setup 5MC to properly key CW and switch PTT can be found HERE.
1. CW Speed Setting via Menu: Management-CWSpeed
|
|
EXAMPLE: Actual speed: 139 char./min Setting Speed: · Entering exact new value manually · Picking new value from dropdown list
· KEY PageUP + n char./min · KEY PageDown - n char./min
Speed Change in Macros · < + n char./min · > - n char./min
n is defined under Menu: Management-5MCSettings-CWSettings: Speed Step |

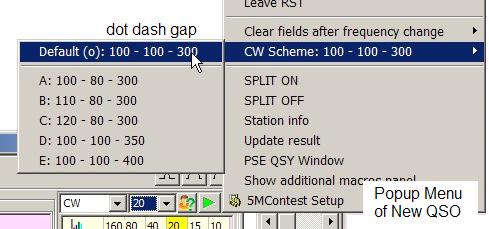
2. CW keying characteristics can be set through the dropdown menu of the “New QSO” windows. Default: 100-100-300 or under Menu: Management-5MCSettings-CWSettings: Duration ms. It defines the relative duration of the dot/dash gap, dot length and dash length.
3. CW Keying
CW keying can be done the traditional way with
- any CW Keyer,
- PTT through Foot Switch, BK-IN or button
To key standard Contest texts Macros can be used.
These are started in 5MC from the computer keyboard
- pressing the macro keys F1-F12 or ALT+F1 – ALT+F12
- pushing ENTER in ESM (Enter Sends Messages) mode (F1-F12, ALT+F1 – ALT+F12 will also work during ESM operation)
- using the CW-Terminal (ALT+T / Hotkey 16 / Menu: Windows-CW/RTTY/PSK Terminal) to send free text. To use CW Terminal (ALT+T) it is recommended not to use the same COM Port for the CW/PTT signal connection as for CAT.
SSB TX
You can send voice messages using the microphone and\or sound files of .wav format.
Traditional means:
- Transceiver microphone,
- PTT through Foot Switch, Button or VOX
To send standard Contest SSB messages can be used SSB macros:
These are started in 5MC from the computer keyboard:
- pressing the macro keys F1-F12
- pushing ENTER in ESM mode. F1-F12 will also work during ESM operation.
- untypical contest messages need to be sent through the microphone.
Attention!
Using SSB Macros needs quite some experience.
DIGI TX
To send DIGI messages one of the DIGI engines integrated with 5MC must be active.
To key standard Contest QSO texts in DIGI modes DIGI Macros can be used.
These are started in 5MC from the computer keyboard
- pressing the macro keys F1-F12 or ALT+F1 – ALT+F12
- pushing ENTER in ESM (Enter Sends Messages) mode (F1-F12, ALT+F1 – ALT+F12 will still work during ESM operation)
- using the DIGI Terminal (ALT+T / Hotkey 16 / Menu: Windows-CW/RTTY/PSK Terminal) to send free text. To use CW Terminal (ALT+T) it is recommended not to use the same COM Port for the CW/PTT signal connection as for CAT.
Auto CQ
Auto CQ.
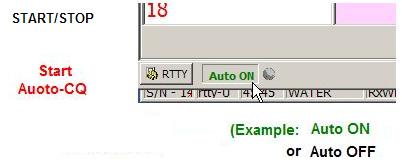
-5MC can repeat CQ calls after a period automatically with the Auto CQ function.
Enable/disable Auto CQ by left clicking the Auto ON/OFF button or pushing Hot key (ID=6, default: ALT+A) in the “New QSO” window
- click left mause or Hot key (ID=6) on Radio 1 (2) или
The Auto CQ Interval is set right clicking on the AUTO ON/OFF button in the “New QSO window”
 input - Example for CW 700
Whether Auto CQ is on for a “New QSO” window can be visually controlled. If Auto CQ is on but no CQ Call sequence is active, the display shows AUTO ON in green, with a CQ sequence active it is in blue.
 - CQ call standby
 -CQ call active
Macros Auto CQ
TXnumber
The TXnumber is the contest exchange normally transmitted during a contest QSO. It contains either a QSO serial number for the contest and/or a constant expression representing a region, a club membership, a geographic zone, …- the contest exchange.
The structure of the TXnumber varies from contest to contest and depends on the specific contest rules. In 5MC TXnumbers all the parts of the TXnumber are entered in one field without blanks in between. 5MC analyzes the input into the field and separates the content correctly.
QSO Serial Number
The QSO serial number part is generated automatically. If numbers need to be left out or changed this number can be overwritten directly in the TX NUM field of the “New QSO” window. Based on the actual serial number part in the TX NUM field the serial number will be increased automatically.
The serial number can be transmitted in messages either
· as part of the complete exchange using the ~[NUM] macro (serial number plus exchange)
· separately using the ~[SRNUM] macro (containing only the serial number).
Contest Exchange
The contest exchange is the constant part of the TXnumber and cannot be changed in the TX NUM field of the “New QSO” window (the serial number part can).
It can be transmitted in messages either
· as part of the complete exchange using the ~[NUM] macro (serial number plus exchange)(
· separately using the ~[STATE] macro (containing only the exchange.
The exchange is entered in the Station Info window (Main Menu: “Management”-“Station Info” – Exchange-Num. Field.
This information is also used separatedly in Cabrillo Reports.
Сontestlogs
All QSO information is saved automatically throughout the contest in the Contest Log. It is the source for Cabrillo reports.Its data is repeatedly backed up and in case of crashes the log file can be recovered, reducing the risk of data loss.
· Creating Log Files
· Recovering Log Files
Aftercontest log checking
If, during in the contest, You were hand-written Log, with its 5MC can be converted to the format of the Cabrillo
For it needs to be clicked "After Contest Log Entry" of the Main Menu-Management .

Notes:
· Date and time - you can only change the last figures. if they was changed
· Band and mode also.
Cabrillo & etc.
Cabrillo Files can be created following steps:
Step 1. Choose Menu: "Reports"-"Cabrillo,SUM,ALL ..."
|
|
Reports MENU
- open the Cabrillo file header
- finding errors in the control numbers - finding errors in callsigns - Bugfix time for the entire report - Statistic filters |
|||
|
Step 2. Personal data input for the Cabrillo file header
Step 3. Once all boxes are filled in, the Cabrillo Log can be created.
Menu of the "Settings for Cabrillo.SUM and ALL files" Window
· Reports – Create/save a log in different file formats (Cabrillo, ADIF, SUM (summary file), ALL (text file with all fields), MUL (multiplier list) · Statistics – Create/save different contest statistics · Remark – Create/save ERMAK operator file (Russian Cabrillo version) · Help - Open the Help information for the “Settings for Cabrillo, SUM and ALL files
|
||||


Finding errors
5MC gives You the ability to find alleged errors in:
· control numbers
· correspondent callsigns
The proposed solutions do not have 100% accuracy!
Will Use it - Your personal decision!
... control numbers
5MC gives You the ability to find alleged errors in control numbers
Example: Log have binary send numbers - 227!!!
The proposed solutions do not have 100% accuracy!
Will Use it - Your personal decision
... callsigns
5MC gives You the ability to find alleged errors in correspondent callsigns

ON5OO there are three in Your report (saved to disk)
But MASTER.dta have not it!
The proposed solutions do not have 100% accuracy!
Will Use it - Your personal decision!
Time shift
If time in the whole log needs to be corrected, the "Time Shift Log" function can be used. It is opened under Menu-Reports.
To open this form
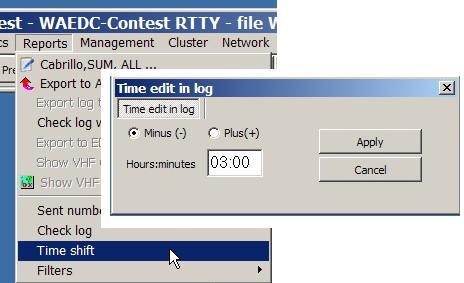
- The option "Minus [-]" will reduce the time in all log entries of the log file. Example:Time reduction of - 03:00 (hh:mm).
- The option "Plus [+]" will increase the time in all log entries of the log file.
- The time difference to be applied is entered into the "Hours,minutes" text box.
- The "Apply" button is used to apply the change to all records and close the window.
- The "Cancel" button will close the window without applying any changes.
Recovering
If the system was abnormally turned off You can Recovery log the proposed:
|
|
from this methods:
|

Filters
Menu Line: Reports - "Filters"
Filters are an analysis tool that allows filtering the current log.

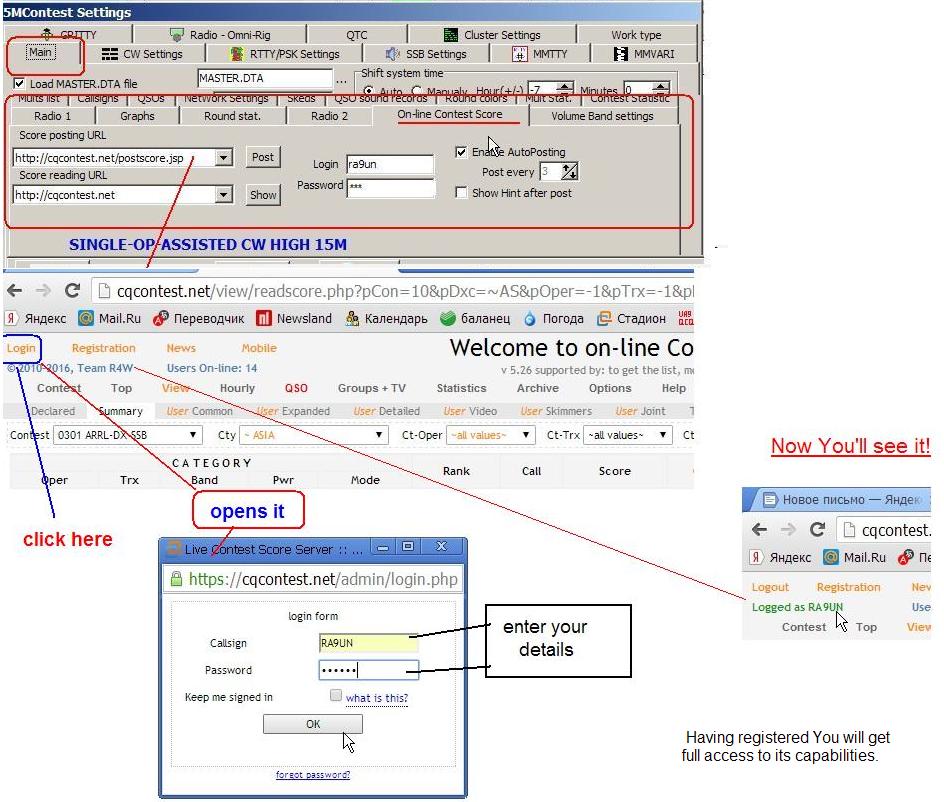
On-line Contest Score
The Online Contest Score function allows to send the stations results to the on-line Contest Server ("Post Now"-button) and to show the live Contest On-line Scores ("Show"-button) for all active contest stations using this service.
It can be used with either http://cqcontest.ru or http;//getscores.org.
It is controlled via the "On-line Contest Score" tab selected via Menu:”Management”-"5MC settings"-Tab: “Common-On-line”-“On-line Contest Score”. The login data entered is needed for the autopost function.
Record book
After Contest You can to archive summary sheet.
Step 1. Open Record Book (as here)
Step 2. Select "Add result"

When the final results of a contest are published, results can be corrected editing the individual lines using the popup menu function “Edit” for the individual result line in the Record Book.
Statistic
5MC offers different types of live contest statistics:
On-line QSO digrams
Tabular forms
Main Menu: “Windows” and Example some forms
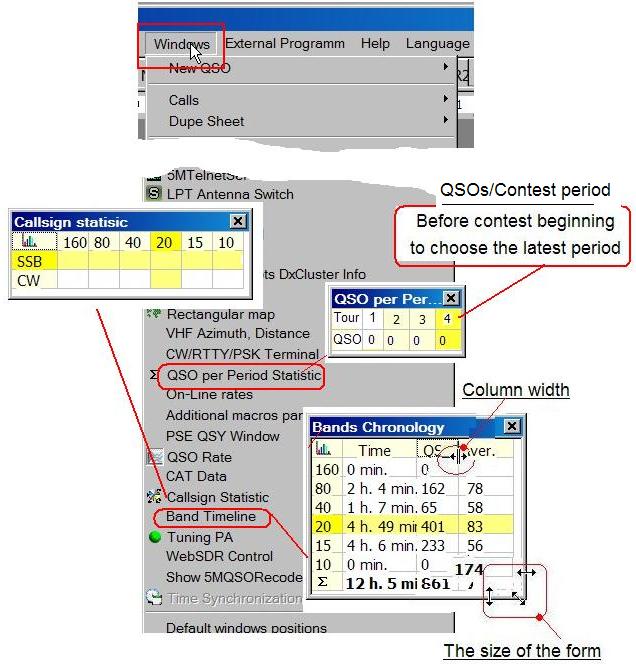
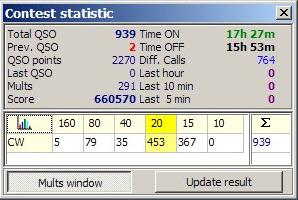
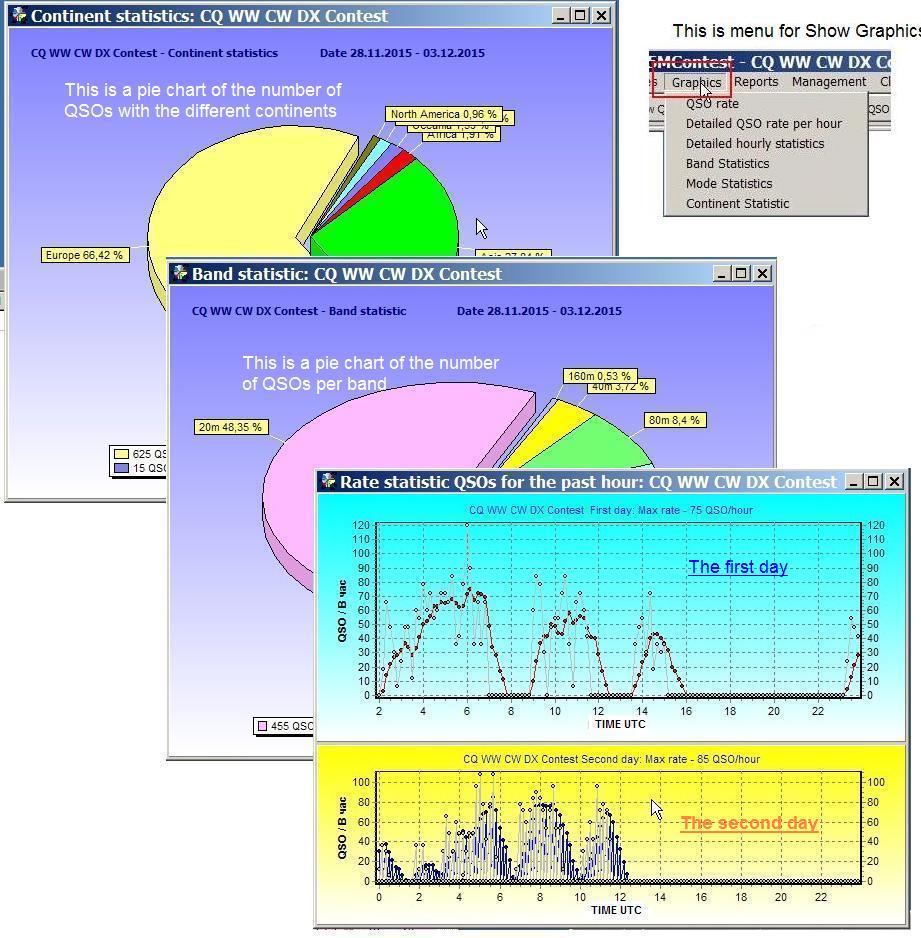
Contest statistic – Live information on the contest performance
Main Menu: “Windows”-“Contest Statistic”
- QSO Rate - QSO/hour in real time
· To open its - Main Menu: “Windows”
· Locations and sizes can - to your taste
· Choice of color and font - 5MContest setting-Common-FormName
contest totals
This windows shows contest totals.

Diagrams forms
Example some form:
- Graphic - QSO in each minute (color) for each hour (vertical) 
VHF
For VHF 5MContest allows to open a window showing “Azimuth and Distance” for the QSO. The window is opened from Main Menu: “Windows”-“VHF Azimuth, Distance”.
As soon as a call is entered in the “New QSO” window, Azimuth and Distance are displayed.
The same information is shown in the bottom line of the rectangular map window (main menu: “Windows”-“Rectangular Map”). In the bottom line of the azimuthal map window (main menu: “Windows”-“Azimuthal Map”) just the azimuth is displayed.
WAE
This section explains how to use 5MC to receive and send QTC series in the WAE contest (CW, SBB and RTTY).
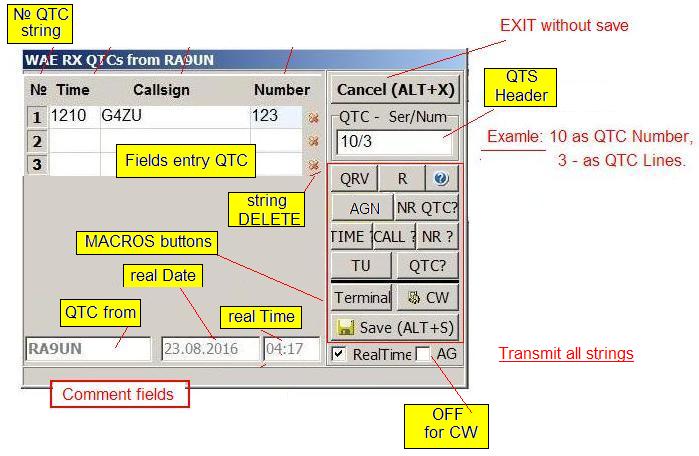
QTCs are messages containing information about QSOs previously logged in the contest. QTCs are sent series of up to 10 QTCs having a QTC series header and QTC message strings.
· QTC series header: Example: “3/8”. The QTC series number 3 sent by the station will contain 8 QTCs.
· QTC lines. Example:
1210 G4ZU 123 (1210 - QSO time. G4ZU partner callsign, 123 RX-Number from partner)
5MC support the Sending and receiving of QTC series with 2 specialized windows.
They are opened via "hot keys" (default CTRL+R for receiving and CTRL+S for sending QTC series). These hotkeys with ID31 and ID32 can be assigned to other key combinations as all 5MC hotkeys under Main Menu: “Help”-“Hotkeys Settings…”.
Stored QTC Messages Management
Stored QTC Messages Management
|
- HotKey* to start this QTC message
|
|
Buttons: · for START Macros (Left mouse) · or open setting Form (right mouse)
Setting forma
- SSB – sound file to be started - CW – CW message to be sent - RTTY – DIGI message to be sent |

Button of macros
|
|
Caption - Situation
aption - Situation
- QRV – Message to signal “Ready to receive QTC series”. - R – Message to signal “Ready” - NR QTC – Request to repeat QTC series number - TIME – Request to repeat QTC time - CALL – Request to repeat QTC call - NR – Request to repeat QTC QSO number - TU – Confirmation message at the end of the QTC series transmission - QTC - Was Nothing copy
- TERMINAL – Starting the CW or RTTY terminal of 5MC to send individual text messages - RTTY – Editing all Stored Messages in the 5MC Settings Windows’ QTC tab
- SAVE (ALT+S) – Save QTC series and leave the window - CANCEL (ALT+X) – Quit QTC series and leave the window Realtime (if ticked for date and time of the QTC Series PC system time is used |
3. To START MACROS:
· button
· double click into the problem field
· click the № problem-line
QTC Macros Management
Alternatively all QTC messages can be edited opening the QTC Tab in the “5MContest Settings”.
Main memu
|
|
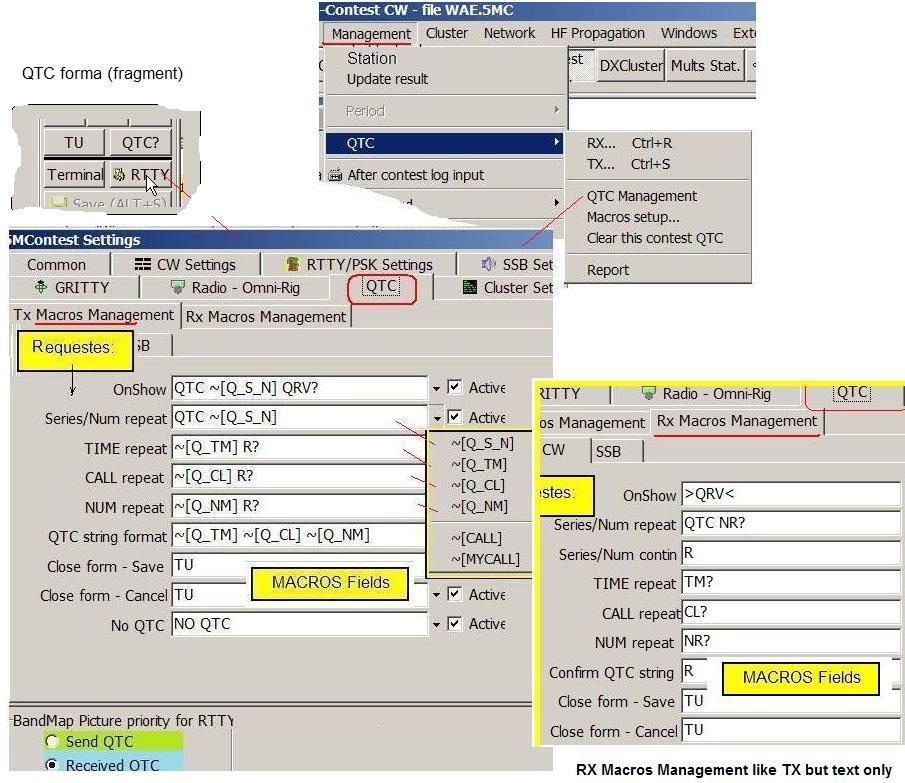
Available Stored QTC Messages:
- OnShow – Message sent when the QTC Series window is opened
- Series\Num repeat – Message to request the QTC header again
- Series\Num continue – Message to signal that the header was received (only available for QTC RX window)
...
- QTC Again – Repeat request for an individual QTC line
QTC Windows
To receive and send QTC series 5MC offers two identically looking windows – the QTC RX / QTC TX windows.
· the QTC RX window is used to receive QTC series
The operator enters “QTC series header” and "QTCs” individually *
* For CW and SSB – input from Keyboard,
* For DIG – clicking content in the DIGI RX Window (CLICK or AUTO)
Example: QTC series reception using the QTC RX window
· For transmission of TX QTC Forma
enters fields "data entry QTC" and "QTC Header" - AUTO.
TX QTC forma
1. As soon as a call of a station qualified to receive QTCs is entered (Example - RA9UN can receive 10 QTCs) the QTC TX window can be opened by
· Using the hot key - ID № 31 (default Ctrl+S)
· Selecting “QTC”-“TX” in Main Menu “MANAGEMENT”
· Pressing a F Key with the ~[QTC_S] macro assigned.
When the QTC TX Window is opened 5MC automatically sends “QRV?”. The QTC series header and the QTC lines will be filled in automatically.
|
|
QTC series transmission can be left anytime without saving by clicking CANCEL or with ALT+X
Right click on buttons to edit its message
If sent QTC series was properly copied by the
When QTCs are send do NOT click ENTER |

2. To send QTCs line by line (for CW and SSB) press the F keys F1, F2, … All QTCs of the series can be sent at once (DIGI) using the TX ALL button.
3. On request the transmission of QTC series content can be repeated:
· QTC Series HEADER – clicking into QTC-Series/Num field or the “NR QTC” button (or ALT+Q)
· Individual QTC Lines - pressing Key F1 to F10 (F+№ of the requested QTC) or by clicking the QTC line Nr.
· TIME – clicking into the field TIME or ALT+T
· CALL – clicking into the field CALL or ALT+C
· NR – clicking into the field Number or ALT+N
· ALL – clicking the “TX ALL” button
QTC RX Window
1. As soon as a call of a station qualified to receive QTCs from is entered (Example - RA9UN can receive 10 QTCs) the QTC RX window can be opened by
· Using the Hot key ID № 32 (default Ctrl+R).
· Selecting “QTC”-“TX” in Main Menu “MANAGEMENT”
· Pressing a F Key with the ~[QTC_S] macro assigned.
When the QTC RX Window is opened 5MC automatically sends “QRV”.
|
|
QTC series reception can be left anytime without saving by clicking CANCEL or with ALT+X
Right click on buttons to edit its message .
If QTC series was properly received it is To receive the QTCs of the series line by line (for CW and SSB) the ticker AG must be OFF. To receive all QTCs of the series at once (for DIGI) the ticker AG must be ticked (ON).
Do NOT type the ENTER key before the end of a QTC reception!!!
|
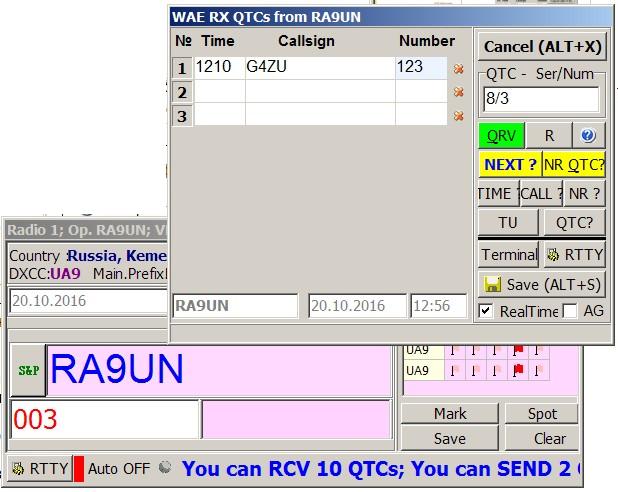
1. The operator enters “QTC Header” and "QTC lines" independently.
* for CW and SSB from the keyboard,
* for DIGI clicking into the DIGI RX Window – clicking individual lines or AUTO
2. If content of the QTC series was NOT copied it can be requested again:
· QTC series HEADER – clicking into the field QTC-Series/Num or clicking the “NR QTC?” button (or ALT+Q)
· Individual QTC Lines - pressing Key F1 to F10 (F+№ of the requested QTC) or by clicking the QTC line Nr.
· TIME – clicking into the field TIME or ALT+T
· CALL – clicking into the field CALL or ALT+C
· NR – clicking into the field Number or ALT+N
· ALL – clicking the “TX ALL” button
QTC EDITOR
Window QTC Management - QTC-Editor (Main Menu: “Management”-“QTC”-“QTC Management”
|
|
To open it |

How work with it:
1. To replay QTC series QSO Recorder must be switched ON.
2. Select the QTC series to be edited. Example: QTC series from UA4HAJ.
3. Replay the recorded QTC series
4. Compare the text written with originally received QTC lines
5. Correct identified mistakes in the table. Example: QTC selected to correct received number 008 to 007
6. Save the changes using the “blue disk” button
5MContest Main forms

The control panel window called Main Window with its main elements “main menu” and “main buttons” allows to execute all necessary functions of the program.
· Main menu – overview and description of its elements
· Main buttons – overview and description
Main menu

· Main menu – overview and description of its lines and elements.
· Files - editing, saving or loading of files
· Graphics - showing graphical analytical elements
· Reports – creating log files
· Management
· Network – setting up the network
· HF Propagation – informing realtime about the HF propagation
· Windows – listing all windows of 5MC
· External programs – starting the programs listed
· Help
· Language – setting the programs language (needs a restart of the program to be effective)
Files
|
menu Files
|

Profile
Each team member can create his own 5MC user profile to store his personal settings and his own macros. Like that every user can work comfortably 5MC in his own way.
To do this:
1. Open the needed contest module.
|
|
2. Adapt the settings and
If an existing profile shall be
3. Save the settings to a new Example: SERGE |
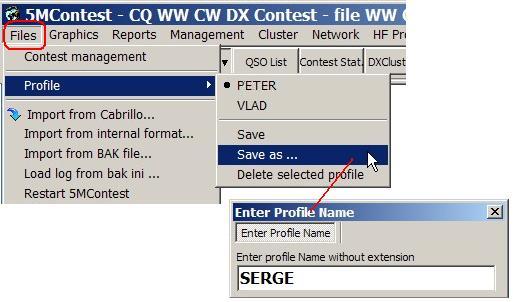
Example: ARRL DX Contest profile of a HB2T team member
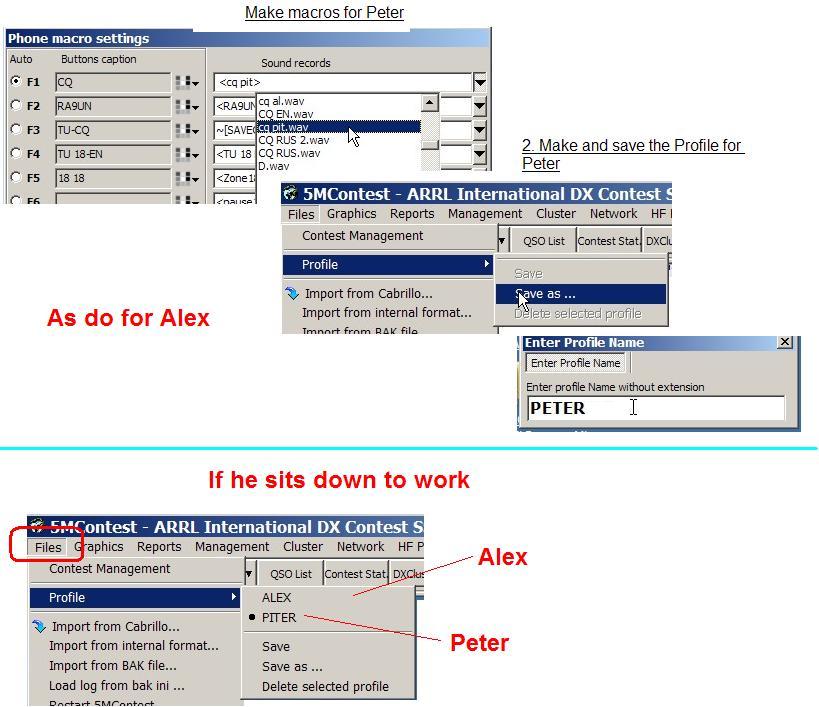
When an new operator starts working in a contest, he clicks Main Menu: “Files”-“Profile”-“his profile” (Example: Piter - Default).
Skins
The look and feel of 5MC can be changed using skins. A number of different skins are available with 5MC and can be chosen through Main Menu: “Files”-“Skins”-“skin”.
 er topic text here.
Editing HLP files
The database with the Entries for the Contest Exchange Guessing can be edited in an application opened under Main Menu: “Files”-“Edit HLP file…”.
|
Example When in the Russian DX Contest Domain HLP-File RA9UN has the wrong Contest Exchange “CE” (instead of “KE”).
To correct it (4 steps):
1. Open the HLP File Editing window: Main Menu: “Files”-“Edit .HLP file…”-“Open…” 2. Choose the help file for the contest (e.g. RDXC). 3. In the left part of the window enter the Callsign “RA9UN”. This will list the entries in the file and position the entries to show the calls alphabetically next to the callsign entered. Correct the entry in the list entries (RA9UN - KE). 4. Save the change choosing Close the window saving the change (Menu: “File”-“Save HLP file as …”).
New entries can be made using the fields in the right part of the window. Entering a callsign and an Exchange will add it to the file. There can be multiple entries for a call. The first one in the list will be used as guess for the exchange in the contest.
Duplicate entries in the list can be deleted form the list by clicking them (to select) and pressing the DELETE key.
After making changes to the file, always choose “save file and save the file (Menu: “File”-“Save HLP file as …” and save the file under the same name.
Under Menu: “Dupe” duplicate entries can be identified (Menu: “Dupe”-“Report”) and deleted (Menu: “Dupe”-“Remove all dupes …”).
For the changes to take effect in 5MC the program needs to be restarted. |
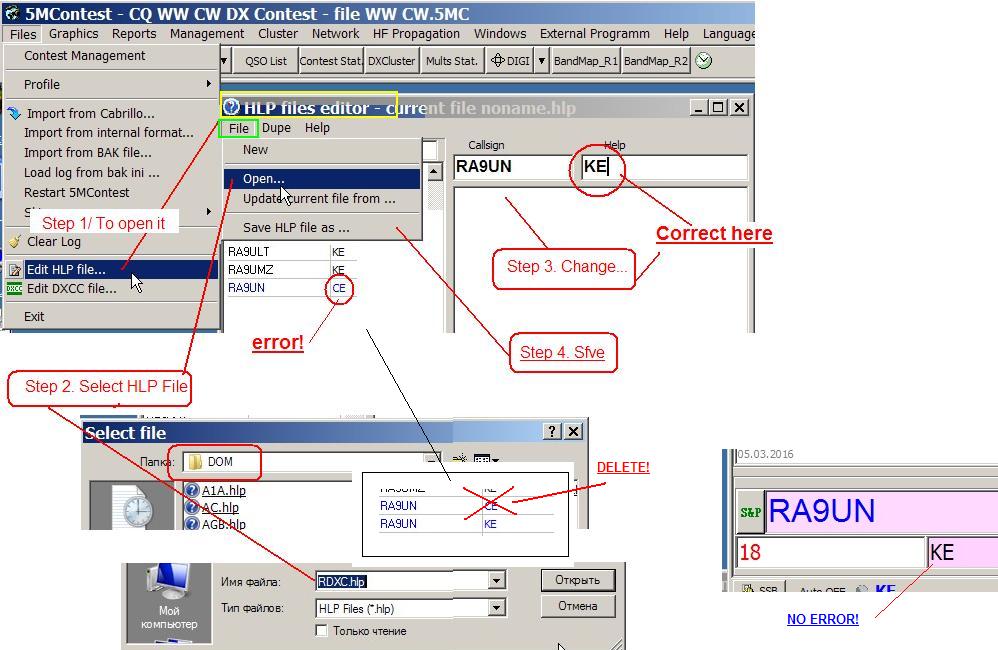
Editing DXCC files
|
Errors in the association of prefixes to country main prefixes for the country file of 5MC can be corrected in the Main Menu: „Files“-„Editing DXCC files…“.
EXAMPLE: Changing association of RA9U to UA9U
|
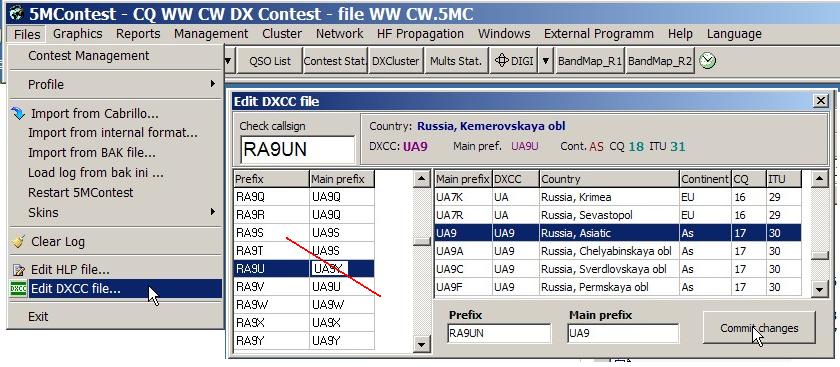
Management
Head menu - Management
|
|
- open own station data window
- enter log data from paper logs
- set CW Speed (new QSO window) - open Macros Editor for the selected mode
- Open the main Settings forma |
Station
Station Form
1. Before starting a contest, information about the own station needs to be entered using the "Station" window.
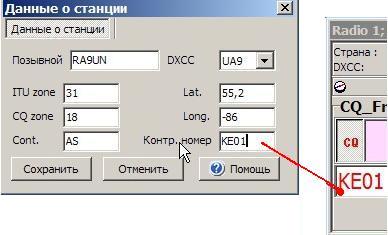
If Contest's Rules require a specific exchange sent with each QSO it is entered into "Exch. num." field. For contests where only serial numbers are exchanged, this field must be empty.
“Callsign” field - Enter your station’s callsign as used in the contest. Example: RA9UN.
ITU zone/CQ zone/Cont./Lat./Long. Fields – this content is automatically calculated from the Callsign entry. It can be overwritten by the user if different, more precise info is available.
"Exch. num." - input for domestic in control number only. Example - 69
Button "Save" - save the changes and close the window.
Button "Cancel" - close the window without saving the changes.
CW Speed
The speed at which 5MC keys CW is changed under Main Menu: “Management”-“CW Speed” or clicking (ALT+S – Hotkey ID=13). Choosing this menu position opens the CW Speed Field in the “New QSO” window.
Example: Setting CW Speed to 120.
To change the speed "PageUp”, “+” or PageDown, “-“ can be used.
The CW speed step size is defined under Main Menu: “Management”-“5MContest Settings”- “CW Settings” in the Speed Step field.

HF Propagatin
- HF Propagation
Main Menu: “HF Propagation”-“HF Propagation and Solar-Terrestrial Data” opens a window with realtime information about HF Propagation.
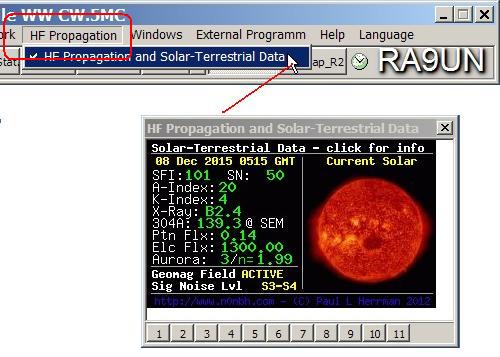
The information can be received from 11 different sources.With the buttons at the bottom of the window the different sources (1-11) can be selected.
Additional information about the different parameters displayed can be found on the different websites.
Windows
Main menu - Window
|
etc. |
Menu-lines - Contents and notes
- New QSO - opens the"New QSO" windows for to enter QSO data for Radio1 and Radio 2. - Calls - opens the "Calls" help window. It shows similar callsigns to the one entered having been worked in recent contests.
- QSO List (or Ctrl+L) - opens the "QSO List" window. It is the active contest log showing all the QSOs worked in the active contest.. - Previous QSO - (Ctrl+L) - opens the "Previous QSO" window. It displays all the QSO with the call already entered into the same contest log.
- Contest statistic - opens the "Contest statistic" window. It shows realtime performance numeric information about the active contest work. - Mult statistic - opens the "Multiplier statistic". It shows realtime information about the multipliers worked in the active contest. - Digi – allows to open the digi windows for the different digi engines for Radio 1 or Radio 2.
- Band Map - opens the "Band Map" windows for Radio 1 or Radio 2 showing the dx spots in the active band. The BandMap for Radio 2 works only with Radio 2 activated. - QSO Records player - opens the "Records player" window with all .wav files recorded fot the contest. - CW Self-control - opens the "CW Self-control" window displaying the CW signal in a waterfall diagram allowing to exact visual CW frequency tuning. - Clock - opens the clock window - WWV Info - opens a window with realtime progration information. - Azimuthal/Rectangular map - open windows with an "Azimuthal/Rectangular Map” displaying the location, direction and information of the QSO partner. - VHF Azimuth, Distance - open the "VHF Azimut, Distance" window displaying Azimuth and Distance to the QSO partner (mainly used in VHF contests) - CW/RTTY/PSK terminal - opens the "CW/RTTY/PSK terminal" to enter free text to be sent via the transmitter. - QSO round statistic - opens the "QSO per Period statistic". - On-line QSO rate digrams - opens the graphical QSO rates statistic showing the realtime rates for the last 60/10/5 minutes. - QSO Rate – opens a graphic showing the QSO of all the hours worked in the contest graphically. - CAT info - opens the Remote Transceiver Control window. - Tuning PA – opens a window allowing to set the TRX to TX/back to RX. - Windows by default – sets the windows of 5MC back to their default positions.
|
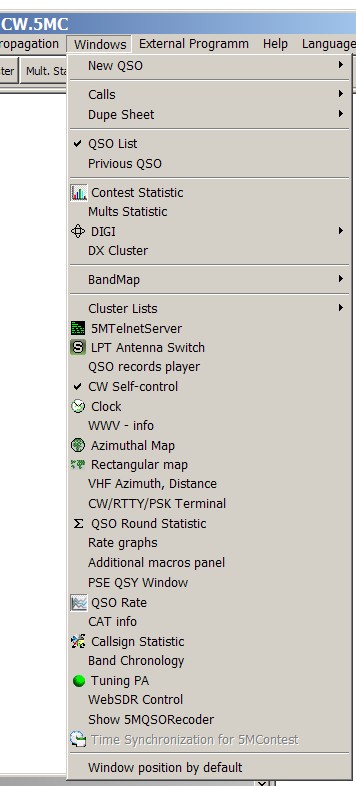
Maps
Opened through Main Menu: “Windows”- "Azimuthal or Rectangular Map" QSOs can be graphically displayed on world maps. Map colors can be customized through Main Menu: “5MContest Settings” – “Common” – “Map Settings”. With the option “ShowSpots” not only the active QSO but also cluster spots can be visualized.
To open the form "Azimuth map"
Or Rectangular Map
VHF Distance
Line menu Window - "VHF Azimut, Distance"
Open the forma "VHF Azimut, Distance" with informaation about corr.
It's forma for VHF-contests only.

You can see Distance when callsegn in the TextBox "New QSO" forma will the end.
Example: RK9AD
CW/RTTY/PSK terminal
In some contest situations it is necessary to send free text messages.
This can be achieved using the CW/RTTY/PSK terminal opened via Main Menu: Windows – “CW/RTTY/PSK terminal”.
- Opening this window will immediately force the TRX to change to TX mode.
· Enter the text to be sent into the upper text box
· The bottom text box displays the text sent.
Sending is stopped when the window is closed.
To use the Terminal for CW it is recommended not to use a different serial port for the CW PTT signal than the one used for the CAT interface (via Menu: “Management” – “CW/PTT Settings”).
QSO round statistic
Main Menu: “Windows”-"QSO round statistic"
For contest with multiple periods the number of QSOs per period is displayed in this window.
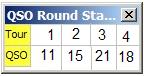
On-line QSO digrams
- On-Line Rates – Detailed Live Performance
Main Menu: “Windows”-“On-Line Rates”
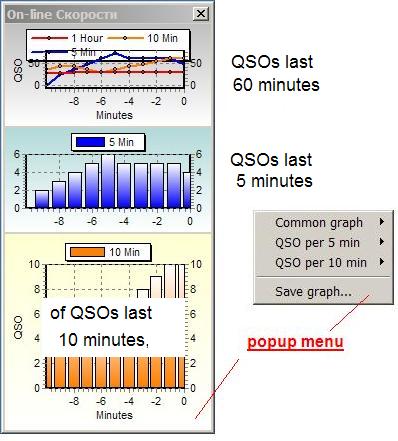
Records player
You can to use "Records player" listen QSO If Recorder was ESM Records
QSO Rate
Window - "QSO Rate"
It is diagram of the QSO/hour on live
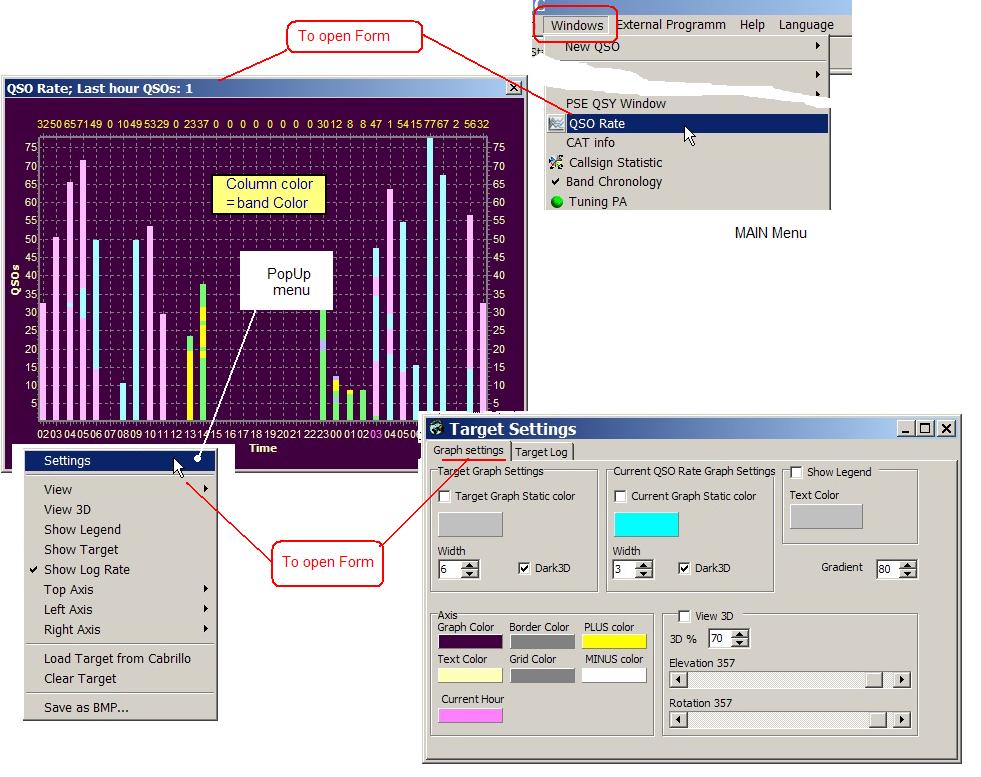
- vertical - QSO.s
- horizontal - hour in the contest
- any color - any band or mode.
Help
Head menu - Help
For calling any information about 5MContest soft.
|
|
- "About program..." - info about author and Her helper - "5MContest.Help" - Open the full HELP file.
- "Contest rules" - Open forma of contest rules for this soft. Now Info from QRZ.ru - "Contest results" - Open forma of contest results for this soft. Now Info from QRZ.ru
- "Supported contests" - Open List of Supported contest. - Open list of contest-modules - "Hot keys settings..." - Open the forma of exchange any hot-keys in this soft.
- "Errors log" - List of the errors soft work (Info for author only). - look at HERE - "Version" - Soft version Number |
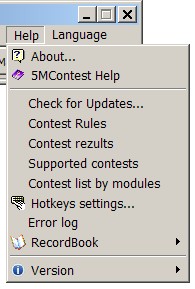
Hot keys settings
5MC have more 110 Hot Key commands.
To learn or change it - Define Hot Keys form
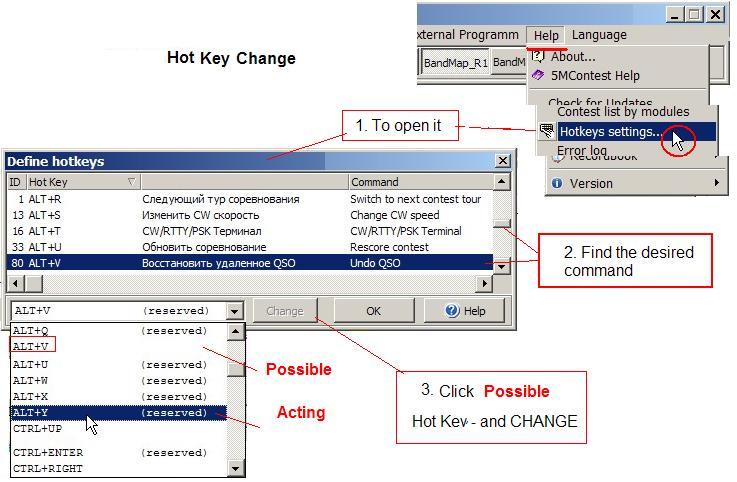
Read the all list. If some combination will be uncomfortable - change it.
For it:
· Select need line. Example "Undo QSO"
· In the Combo Box to select new Hotkey which we want.
Example: ALT+V It must be EMPTY
· Press "Change"
*If the desired combination is occupied it can be freed by putting NONE
** In Text This HELP have only links ID.
Language
Language select:
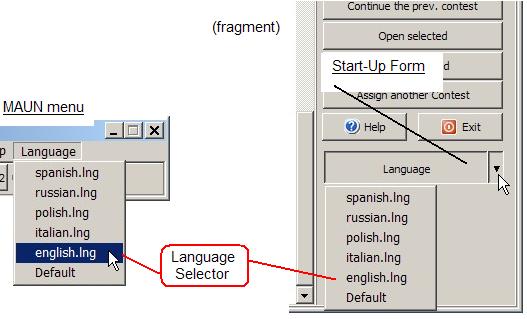
Example - English
The Change will to act after re-Start 5MC
Button station
Button station
It is third line of Main forma
It Buttons ACTIVE will SHOW Forms:
· Main buttons - acquaintance and the description the elements of main forma
· New QSO - for input QSO Data
· Prev.QSO
· Calls - CALL reference
· QSO List
· Mult. Stat.
· DIGI
· Band map R1 or R2
· Clock
Calls
Button Main forma- "Calls"
Open the "Calls" tow types forma.
It data set from Master.dta file.
Selected Callsign will to input TextBox CALL of the New QSO forma.
Call Forms for Radio-1 This soft have forma "Call 2"
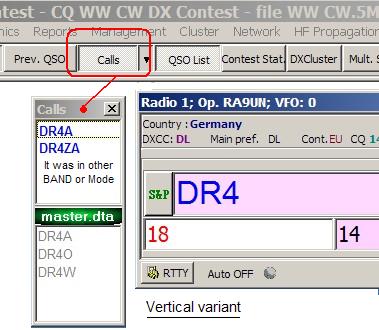 -
- 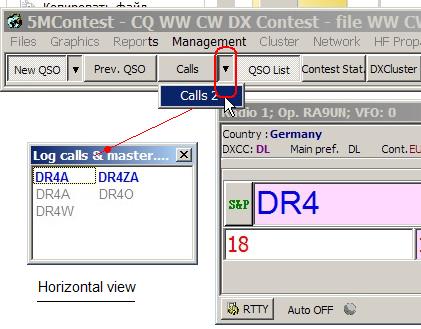
Example:
At start input the DR4 call Into the CALL-Box.
Show At the "Calls" forma:
· Part UP - All callsigns consist "DR4A" from Your log.
· Part DOWN - All callsigns consist "DR4" from Master.dta file
If click DR4A-line, it Callsign will auto set into the CALL-Box of the New QSO forma and informaation about it also.
Maybe You can not found any call at the "Calls" forma
· It call in the Master.dta not have
· Mistake have In call-input
.
"Call". for Radio-2
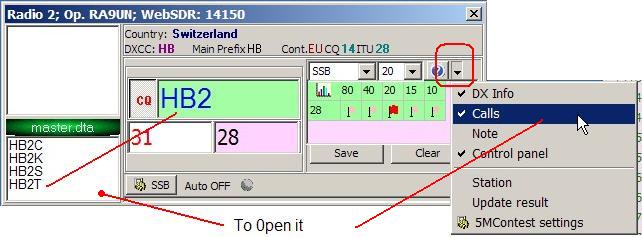
QSO List
QSO List Will auto to save all Data QSO.
Edit QSO form - for Editing was mistakes
The list line COLOR - as Band Color. tf 5MContest Setting-Main was ON "Highlight bands"
Columns editor for show List column.
Previous QSO
Button - "Prev.QSO"
Open the Form of Previous QSO with informaation about all QSO before.
You can to look all (Example DR4A) QSO before
Popup "Column editor", You can ON/OFF any Column Previous QSO forma.
Mults statistic
Main forma - Button "Mult.Stat"
Open the Mults statistic forma

Contest statistic
Button Main forma - "Contest statistic" (or Ctrl+S)
It is Show of the online Contest statistic.
 .
.
- Button "Mults Window" - To open forma.
- Button "Update result" - may be AUTO
Clock
Main forma - Pic. "Clock"
Open the Clock
If click left mouse into - forma change.
 Pic.2
Pic.2
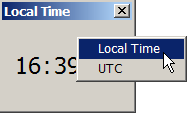
Click right mouse - Select-menu for UTC or Local time.
5MContest Setting
|
|
- To open Your DATA Form - Update
- Create CABRILLO from handmade logs
- Opem Macros form
- Open MAIN Setting form |
Form 5MC setting have three parts
- Part 1 (Top) - ON/OFF and Selector the help-Options for Any contest
- Part 2 (Meddle) - Selector the forma's-Design
- Part 3 (Down) - Some...
Part 1 (Top)
5MContest setting Form (part 1)
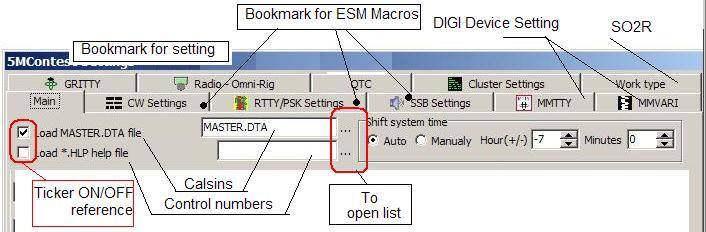
About Setting Bookmark:
· GRITTY - To open Device (if it will set)
· QTC - Menu for WAE Work
· Main - Head setting
· MMTTY
· MMVARI
NOTES:
If the transceiver-mark no into "Rig tipe" Will no CAT-system work! Address to the developer Omni-Rig.
Part 2 (Meddle)
5MC settings Form - Part 2 (Average part of the image of the forma)
It have Bookmark Panel Selector for Design and setting some forms.
In it You can:

Example - select the "External program" with CW Skimmer for Radio 2.
1. Other Setting Bookmark:
· Reports - auto replacement TEGs for ADIF
· Filters - setting CW-filters (For Kenwood only)
· EDI Settings - replace VHF BandName
· External program - Selector and setting for it
· QSO Sound records - Recorder setting
· Volume Band setting - Band volume for Recorder
· On-line Contest Score - Contest-Stadium connect
2. Shift and colors some forms - all other
Part 3 (Down)
5MC settings Form - Part 3 (Fragment with useful tickers)
Tickers ON/OFF : Clear ... [200Hz]
|
Will Clear all fields "New QSO"after change Frequency more then 200 Hz. lighting bands in QSO list - ...need for the team -
|
|

Ticker "Select number"ON - handy for quick replacement of static control-NR
CW Setting
Fragments "CW Setting" Form
CW for CQ

- Tickers
· If Ticker ESM - OFF will NOT AUTO send all macros from this form, and other functions 5MC will NOT to send AUTO
· If Ticker "Work DUPE" OFF Not will to send macros B4.
ON - To send "B4 macro" only.
· "Move cursor after report"
- ON - After send "Report macro" cursor from CALL windows will goes in "RX-NUM" auto (Form New QSO)
CW for S&P (look also HERE)

- Tickers:
"Use ESM S&P" - Start/Stop ESM mode.
· "Aleays Call by Enter..."
- ON - To send "Callsign"-macro in Start QSO without TX-NUN.
- OFF - Not send "Callsign"-macro in Start QSO. Only TX-NUN.
· "Move cursor after report"
- ON - After send "Report macro" cursor will goes in "RX-NUM" auto (Form New QSO).
II. Fields ESM-macros and situations look at here.
About other Macrcos - here
Morse-code formatting
fragment "CW Setting"- Part 3 (Down)
1. Morse-code formaatting at "Durations in ms"-frame.
Soft have 6 formaats. It is - Default, but You can change at hand.
For it:
- Select some formaat A or B etc.
- Into ListBoxes input Your value. If CW-speed to change these parities will remain
2. "Shortening for CW"-frame" - for Shortening some CW figures. Example - 0 as T.
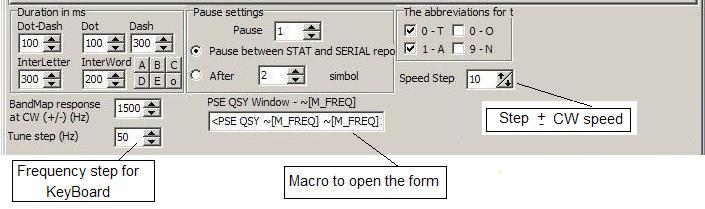
3. ListBoxes "Pause in stat." - Selector of the TX-Pause between serial and domen parts TX-NUM. 1=1 Dash.
4. ListBoxes "CW via PC-Speaker." - ON/OFF PC-Speaker/ Near the Tone-selector.
5. CheckBox "Stop CQ if call change" - TX AutoCQ will stop after input any symbol into the TextBox "CALL"
6. ListBoxes "Reaction BandMap" - Selector to the Reaction BandMap
7. ListBoxes "Step setup [Hz]." - Selector Frequency-step for tuning of the transceiver.
Cluster setting
Here is open forms of the OLD CLUSTER-filters lable.
|
|
This is tickers of comments near spot on Band Map
BLUE - Cluster spot GREEN - Skimmer spot |
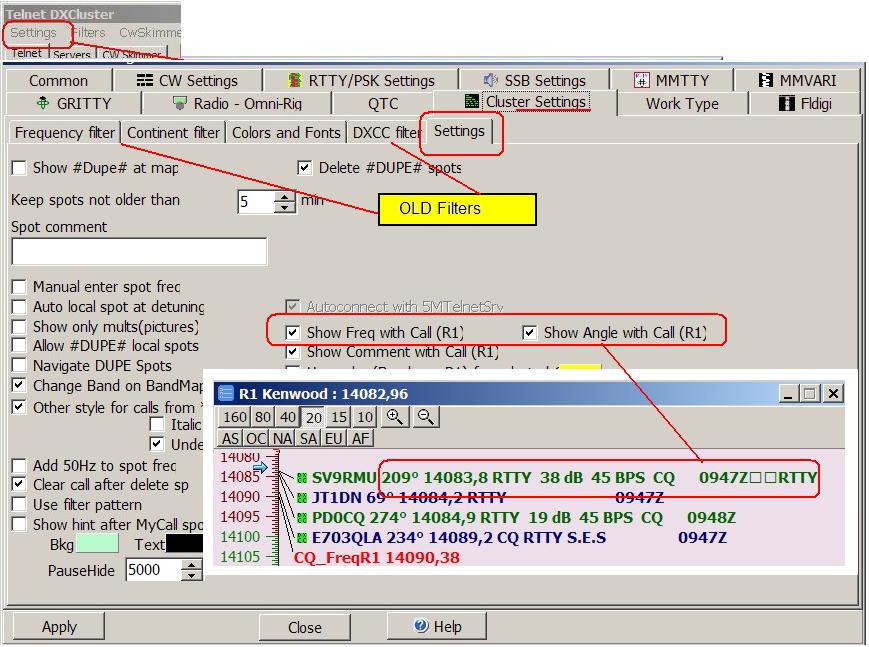
SSB Setting
Fragments "SSB Setting" Form
I. for CQ

- Tickers
· If Ticker ESM - OFF will NOT AUTO send all macros from this form, and other functions 5MC will NOT to send AUTO
· If Ticker "Work DUPE" OFF Not will to send macros B4.
ON - To send "B4 macro" only.
· "Move cursor after report"
- ON - After send "Report macro" cursor from CALL windows will goes in "RX-NUM" auto (Form New QSO)
II. for S&P

- Tickers:
· "Use ESM S&P" - Start/Stop ESM mode.
· "Move cursor after report"
- ON - After send "Report macro" cursor will goes in "RX-NUM" auto (Form New QSO).
II. Fields ESM-macros and situations look at here.
About other Macrcos - here
RTTY/PSK Setting
Fragments "RTTY/PSK Setting" Form
I. for CQ
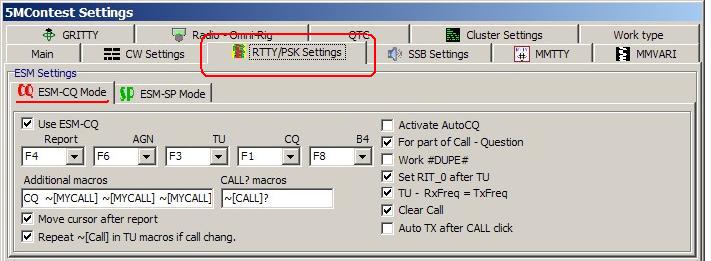
- Tickers
· If Ticker ESM - OFF will NOT AUTO send all macros from this form, and other functions 5MC will NOT to send AUTO
· If Ticker "Work DUPE" OFF Not will to send macros B4.
ON - To send "B4 macro" only.
· "Move cursor after report"
- ON - After send "Report macro" cursor from CALL windows will goes in "RX-NUM" auto (Form New QSO)
II. for S&P

- Tickers:
· "Use ESM S&P" - Start/Stop ESM mode.
· "Move cursor after report"
- ON - After send "Report macro" cursor will goes in "RX-NUM" auto (Form New QSO).
II. Fields ESM-macros and situations look at here.
About other Macrcos - here
Reports
Change TEGS of ADI files
|
Some Variant 5MC offers |
|

Exaple;
Was: TEG - CONTEST_D
Will TEG - SR(Tx)_STRING
Design
It is some Example for 5MContest Design

But You Can to set any formas and site it Yourself. You can change size, font and color any formas also.
The size and Location of Forms
You can specify the Size and Location of any Forms in the same way:

Font and Color
In the middle section of the "5MContest setting" form, find the tab with the name of the form. These elements set the color and font
Example - Mult List

It is typical the Windows elements of selector Font and size.